Ares Games
Results 1 to 38 of 38

Thread: 1/144 Cardmodels by Zakopious

  1. #1

    Default 1/144 Cardmodels by Zakopious

    I will start this thread by showing you what not to do.
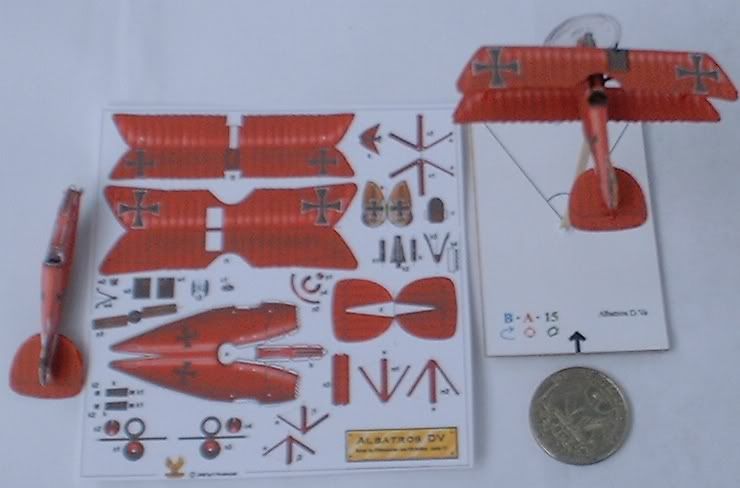
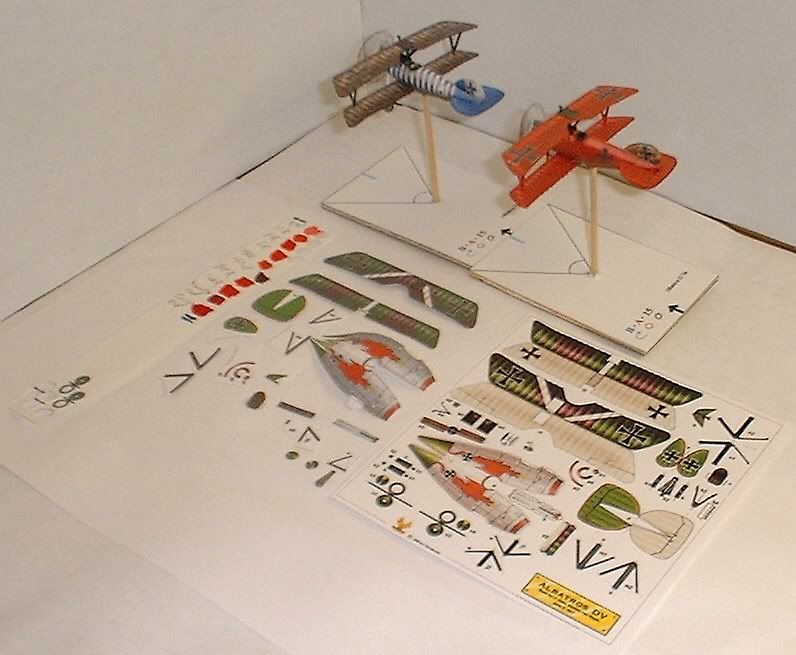
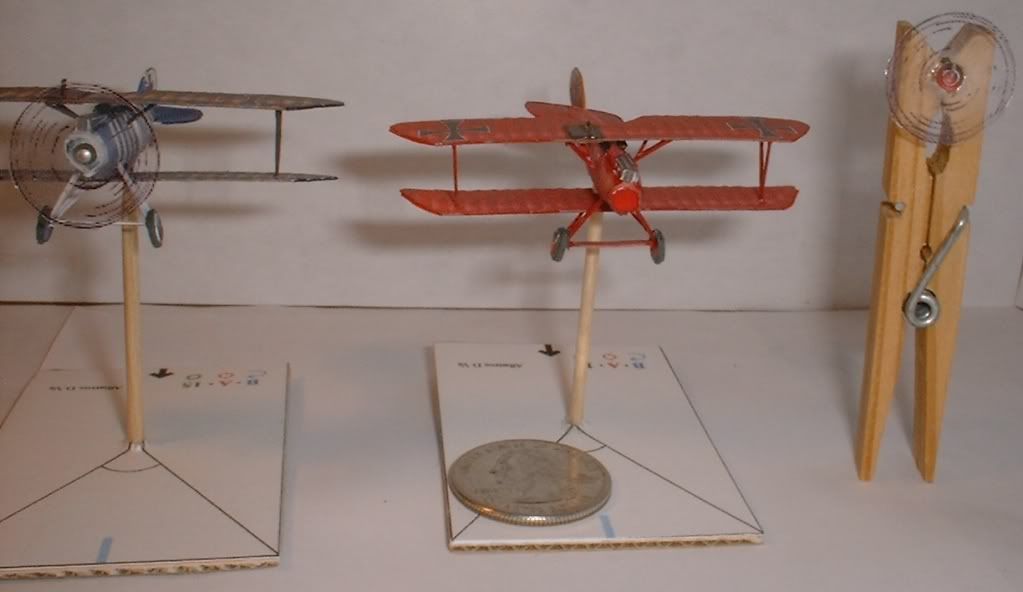
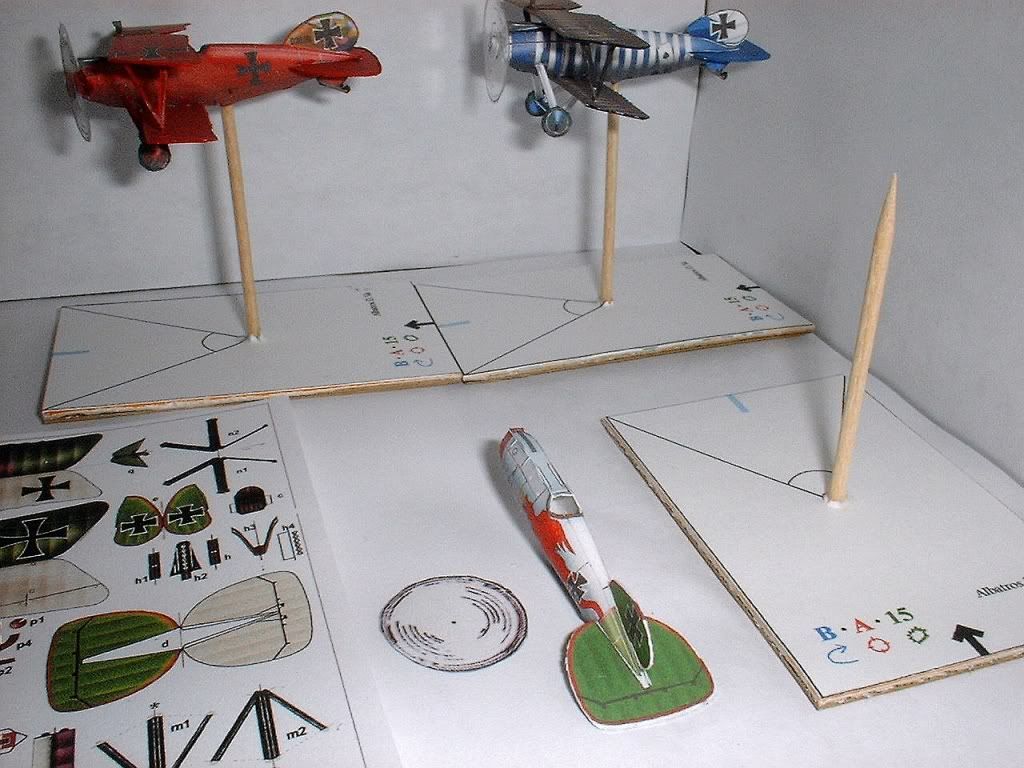
    The picture shows the red Albatros by Prudenzio.

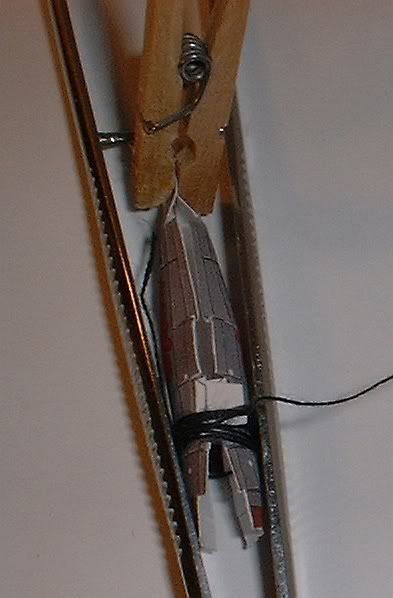
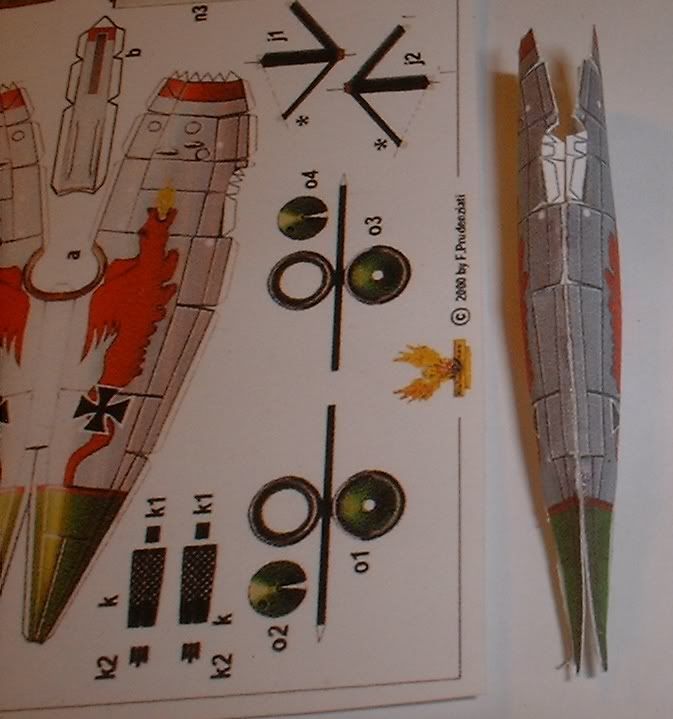
    The wounded fish fuselage on the left, was my first attempt at building the Prudenzio Albatros.
    I made the mistake of gluing all of the right side tabs on the nose before gluing any of the left side tabs on the nose.
    As you can see, the fuselage was warped to the right.
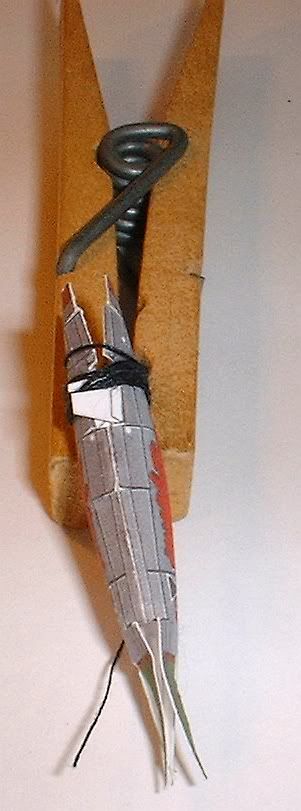
    The completed plane on the right was my second attempt at building the Prudenzio Albatros.
    During the second attempt, the nose tabs were glued on alternate sides: left, right, left, right, left, right.
    This procedure resulted in the straight fuselage in the completed model that you see on the right side.
    Last edited by Zakopious; 02-28-2016 at 10:46.

  2. #2

    Default

    Great job! You guys who can do card models never cease to amaze me! (Maybe its because my fingers are as big around as that quarter, lol.)

  3. #3

    Default

    Quote Originally Posted by somaliavet View Post
    Great job! You guys who can do card models never cease to amaze me! (Maybe its because my fingers are as big around as that quarter, lol.)
    I wrap one end of the fuselage with sewing thread so that I can glue the other end and hold the tabs together with my fingers.

  4. #4

    Default

    Quote Originally Posted by Zakopious View Post
    I wrap one end of the fuselage with sewing thread so that I can glue the other end and hold the tabs together with my fingers.
    Good tip there.
    Rob.
    "Courage is the art of being the only one who knows you're scared to death."

  5. #5

    Default

    My third attempt at building the Prudenzio albatros will be the von Hipple version.
    This will be my first attempt at using edge gluing on an albatros fuselage.
    Notice that many of the small parts were cut out with extra white around them so that they would be easier to fold.
    The fuselage was shaped with the round head of a dressmakers pin so that that it would take a round form when glued.
    In the background are my first two albatrosses: H. Bohning and von Richtofen.
    The wheels have been glued onto a strip of 67 Lb. cardstock to give them thickness.
    The red dots on that strip are tests of different red paints to use for touch-up on the von Richtofen albatros.
    I finally settled on a red called, "Santa".
    My wife does crafts and between us we have a lot of paint.

    Last edited by Zakopious; 10-01-2011 at 11:16.

  6. #6

    Thumbs up

    Kenneth!

    Very nice advice! Plus a great builds! That is to be expected of a Buckeye!


    Rich

  7. #7

    Default

    Those look great Ken! Damn good for paper models too. Do you buy these card models from a site or do you print them out?

  8. #8

    Default

    The seven different albatrosses are free downloads although the designer does request a donation.

    See: http://www.zioprudenzio.it/fok-air.html

    I tell my printer to print the albatrosses at 12.07 % centered on a 4 x 6 inch card.
    In reality, I am printing on 8.5 x 11 inch, 32 Lb laser copy paper.
    By turning the copy paper upside down and also printing on the back, it is possible to print four 1/144 scale models on one sheet of copy paper.
    Do not try to use 20 Lb. copy paper because it is too flimsy.
    If you cannot find 32 Lb laser copy paper, use 67 Lb card stock.

  9. #9

    Default

    Here is a picture of the von Hipple albatross fuselage before any glue has been applied.
    The fuselage was shaped by rolling with a wooden skewer (for city chicken) and also shaped with the round head of a dressmakers pin.
    The nose of the fuselage is wrapped with thread and the tail is held together with a miniature clothes pin.
    The fuselage is resting in forceps so that the belly will stay up allowing a view of the area where the tabs were removed for edge gluing.
    Notice that the edges are close together and will not require much manipulation to bring them together after glue has been applied.
    Also notice that close to the clothes pin, I made a cut in the fuselage.
    In retrospect, this appears to be a bad idea which will cause me trouble later.
    Last edited by Zakopious; 10-02-2011 at 08:17.

  10. #10

    Default

    UHU-twist & glue was used to glue three of the fuselage edges together.
    The glue was applied on the tip of a round headed dressmakers pin.
    I normally use Elmer's white glue but I am experimenting to see if I can find a glue that I like better.
    The UHU glue seemed runny and took too long to grab the edges.
    It appears that excess water in the glue has caused colors in the fuselage belly to run a little (especially red).
    However, edge gluing has produced a rounder fuselage than tab gluing.
    The fuselages of the Richtofen and Bohning albatrosses have a teardrop shaped cross section due to tab gluing.


  11. #11

    Default

    Nice thread Kenneth! I am currently working on one of Prudenzio's Fokker D.VIIs at normal scale on 8-1/2" x 11" card stock. I wanted to try my 1st one at the normal scale before trying one at 1/144th scale. It is definitely a learning experience. I know that with the smaller scale I am going to have to make some modifications to the model. It is hard enough to fold some of the smaller pieces at the normal scale, let alone at 1/144th.

    Thank you for sharing your learning experience with us.

    Todd

  12. #12

    Default

    Quote Originally Posted by toddwf View Post
    Nice thread Kenneth! I am currently working on one of Prudenzio's Fokker D.VIIs at normal scale on 8-1/2" x 11" card stock. I wanted to try my 1st one at the normal scale before trying one at 1/144th scale. It is definitely a learning experience. I know that with the smaller scale I am going to have to make some modifications to the model. It is hard enough to fold some of the smaller pieces at the normal scale, let alone at 1/144th.

    Thank you for sharing your learning experience with us.

    Todd
    My experience at this scale consists of building two of Bizer's DR.1's, three of Prudenzio's Sopwith Camels, and two of Prudenzio's Albatrosses.
    Leave plenty of white around the small parts for easier scoring and folding.
    I have not built any of the Prudenzio Fokker D.VIIs but I have printed some of them out.
    The print was reduced to 12.07 % to get 1/144 scale.
    At normal scale, 67 Lb card stock would work well.
    I find that 32 Lb laser copy paper works well for these little guys.

  13. #13

    Default

    Here is the bottom of the tail.
    Due to my mistake of cutting into the fuselage belly close to the rudder and stabilizer, I could only edge glue the small section of grey to the red line.
    With luck, I will be able to edge glue the rest of the green to the tip of the tail.

  14. #14

    Default

    The Albatross Nose Spinners.
    The green bottom tail edge and the two front bottom edges were glued together on the fuselage without difficulty.
    The spinners are the hardest part of the albatross build.
    In fact the spinners for the H. Bohning and von Richtofen albatrosses have not been done yet.
    The penny has a diameter of 1.9 cm.
    The cardboard is double thickness glued together from a Kleenex box.
    The smaller holes in the cardboard were made with a leather punch.
    The largest spinner ring(p2) fits in the 0.45 cm hole and a 0.40 disk was glued inside.
    However, this resulted in a small gap where the ends should have met.
    I need some more holes between 0.40 and 0.45 cm to get an exact fit for p2 but none of the leather punches are in this range.
    The smaller spinner ring(p4) is an exact fit in the 0.36 hole and was glued with a drop of glue on a pin.
    The tip of the spinner(p1) was shaped with a round toothpick.
    The tip of the toothpick was cut off so that the diameter would approximate the diameter of p1.
    An emery board was used to shape the toothpick to match the finished shape of p1.
    Then the toothpick was used to push and shape p1 into my hand.
    I hope to be able to glue p1 on p4 after p4 is glued to the pin and prop disk.
    The clear plastic propdisk is a free download from Fiddlersgreen.
    The propdisks are printed on plastic transparency for overhead projectors.

    Last edited by Zakopious; 10-04-2011 at 16:28.

  15. #15

    Default

    p4 was glued to the pin and prop disk using UHU glue which adheres to plastic better than Elmer's white glue.
    p1 was glued to p4 using Elmer's white glue.
    The picture shows the prop disk with red spinner before attachment to the red Albatross.
    The prop disk on the blue Albatross shows a haze caused by the CA glue used to attach the pin to the propdisk.
    In the future, UHU glue will replace the CA glue on the prop disk to eliminate the haze.
    Part p2 was attached to the nose of the red fuselage and the inner area painted with Santa Red.
    Part p2 for the the von Hipple Albatross has been glued with out a disk in the middle and that may be a better way to handle that part.

  16. #16

    Default

    Transportation
    This is how I transport my models.
    I found a small box with enough room for six models.
    110 Lb. cardstock was used to make dividers.


    The dividers in the box with planes.


    The cover over the dividers.
    Last edited by Zakopious; 10-31-2011 at 11:28.

  17. #17

    Default

    A nice cheap answer to the transport problem Kenneth, as long as nobody sits on the box.
    Rob.
    "Courage is the art of being the only one who knows you're scared to death."

  18. #18

    Default

    Albatros Build Continued:

    The horizontal and vertical stabilizers have been glued to the fuselage.
    Tissue paper was packed between the tail and the cockpit to help hold the round shape of the fuselage.
    The seat was glued into the cockpit to hold the tissue paper in place.


  19. #19

    Default

    Quote Originally Posted by Flying Officer Kyte View Post
    A nice cheap answer to the transport problem Kenneth, as long as nobody sits on the box.
    Rob.
    Is your transport box strong enough to support the careless sitter ?

  20. #20

    Default

    Quote Originally Posted by Zakopious View Post
    Is your transport box strong enough to support the careless sitter ?
    It has even stood up to the careless faller over the cat and land on it, but I wouldn't want it to happen too often for the sake of the cat.
    Rob.
    Last edited by Flying Officer Kyte; 11-01-2011 at 00:49.
    "Courage is the art of being the only one who knows you're scared to death."

  21. #21

    Default

    Very impressive models - very well made.
    I like the idea with the propeller disks - looks very good!!

    Matthias

  22. #22

    Default

    Quote Originally Posted by Flying Officer Kyte View Post
    It has even stood up to the carless faller over the cat and land on it, but I wouldn't want it to happen too often for the sake of the cat.
    Rob.
    Cat ?
    We have a 95 Lb. Rottweiler to fall over.

  23. #23

    Default

    Quote Originally Posted by Zakopious View Post
    Cat ?
    We have a 95 Lb. Rottweiler to fall over.
    Even I would be able to see a 95 lb. Rottweiler. I don't expect he would take too kindly to being fallen over either Kenneth.
    Rob.
    "Courage is the art of being the only one who knows you're scared to death."

  24. #24

    Default

    These are very nice models, thought have got to admit I am hopless at building any card models.

  25. #25

    Default

    Quote Originally Posted by Ravenlord View Post
    Very impressive models - very well made.
    I like the idea with the propeller disks - looks very good!!

    Matthias
    The propeller disks are a free download.

    See:
    http://www.fiddlersgreen.net/other/F...ners/Props.htm

  26. #26

    Default

    Quote Originally Posted by Doug View Post
    These are very nice models, thought have got to admit I am hopless at building any card models.
    But they are FREE !!

    For Free you could learn how to do it.

    I am sure that your first plastic model was not as good as the models that you make now.

    Try making a cardmodel at 1/72 scale then make the same model again at 1/144 scale.

    I admit that making 1/144 scale models is a bit intimidating at first because they are so small but you will find that it can be done.

    The models will not be perfect.

    However, when they are several feet away from the gamers on the gaming table, they look great.

  27. #27

    Default

    Quote Originally Posted by Zakopious View Post
    The propeller disks are a free download.

    See:
    http://www.fiddlersgreen.net/other/F...ners/Props.htm
    Thank you again!!

    Matthias

  28. #28

    Default

    The area between the cockpit and the nose was packed with tissue paper.
    Part p2 was glued on the nose.
    A bulkhead was glued inside part p2 to hold the tissue paper and painted red.
    The machine guns and the short struts were glued on the fuselage.
    The long struts were glued on the upper wing.
    The needle through the prop disk was cut short so that it does not penetrate the cockpit.
    Parts p1 and p4 were glued on the prop disk to form the spinner.

    The colors on the model seem to become dull but the parts on the printed copy retain their brilliance.
    Perhaps some of the ink is coming off on my hands as I work on the models.
    I should try spraying the next model with a clear coat before working on it.

  29. #29

    Default

    Very nice work Kenneth!
    I am currently working on a Sopwith Camel (by Prudenziati.)
    Everything is going pretty well, but I am getting close to the point where I need to join the two wings together. All of the supports in this model are individual sticks and I have no idea how I am going to get the top wing in position along with all of the supports. I was wondering if you had any suggestions.

    Mark
    Attached Thumbnails Attached Thumbnails camel.jpg  

  30. #30

    Default

    Quote Originally Posted by MrMark View Post
    Very nice work Kenneth!
    I am currently working on a Sopwith Camel (by Prudenziati.)
    Everything is going pretty well, but I am getting close to the point where I need to join the two wings together. All of the supports in this model are individual sticks and I have no idea how I am going to get the top wing in position along with all of the supports. I was wondering if you had any suggestions.

    Mark
    Glue the machine guns and the supports on the fuselage and the bottom wing first.
    After the glue has dried, set the top wing on top of the supports and glue the supports one at a time (after the last support has dried).
    Look up pictures of Camels on the web so that you get the angle of the supports approximately correct.

    See My Thread (especially post #2):
    http://www.wingsofwar.org/forums/sho...s-by-Zakopious

    Your Camel looks great.
    Have you built cardmodels before ?
    Last edited by Zakopious; 11-09-2011 at 09:20.

  31. #31

    Default

    Ok, thanks I will give that a try. The photos in the other thread help a lot.

    Quote Originally Posted by Zakopious View Post
    Your Camel looks great.
    Have you built cardmodels before ?
    Thanks, I have built a handful of cardmodels in the past, but nothing this small. The smallest piece I have done is a 1/72 scale WWII tank for my son.

  32. #32

    Default

    I'm travelling around through my wingmen threads that were given reputation points and seeing gems like this one that I haven't seen before, or in this case for too long. Truly great.

  33. #33

    Default

    Quote Originally Posted by Blackronin View Post
    I'm travelling around through my wingmen threads that were given reputation points and seeing gems like this one that I haven't seen before, or in this case for too long. Truly great.
    Thank you for the praise.

    I would like to do some more builds but I am sole caregiver for my 92 yr. old mother (alzheimers) and my wife will be in and out of hospitals and nursing homes for the next three months due to a knee replacement with unexpected infection in the bone.

    Consequently, I have no time for modeling at the present.

    Ken

  34. #34

    Default

    I hope that everything will be better for you in the near future, Ken. I wish I was nearer to be of help. All else considered, if you need anything that I can do for you, just say the word.

  35. #35

    Default

    Quote Originally Posted by Blackronin View Post
    I hope that everything will be better for you in the near future, Ken. I wish I was nearer to be of help. All else considered, if you need anything that I can do for you, just say the word.
    Joaquim,

    Thank you for the moral support.

    Some times life is good, some times difficult and some times impossible.

    At the present time, life is merely difficult and should become much better after my wife's knee operation is completed and she has recovered.

    Ken

  36. #36

    Default

    Sorry to hear that life is tough for you at the moment Kenneth. We had my mum living with us until she died and it can be a trial sometimes I know. I hope things start looking up for you in the near future. Remember you can always have a chat with us on the Drome to help cheer you up.
    Best wishes for a speedy resolution to your problems.
    Rob.
    "Courage is the art of being the only one who knows you're scared to death."

  37. #37

    Default

    I heartly echo Rob`s sentiments
    All the best to you and yours
    batesyboy

  38. #38

    Default

    Thank you all for the good wishes.

    Life is merely difficult at the present time.

    It could be worse but it should get better in a few months.

    On the bright side, I am losing a few pounds which I need to do.

    Thus, my health may actually be improving.

    Ken


Bookmarks

Posting Permissions

  • You may not post new threads
  • You may not post replies
  • You may not post attachments
  • You may not edit your posts
  •