Ares Games
Results 1 to 10 of 10

Thread: Building the Skytrex Halberstadt C LII.

  1. #1

    Default Building the Skytrex Halberstadt C LII.

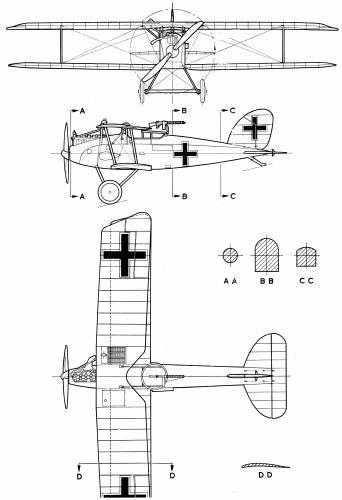
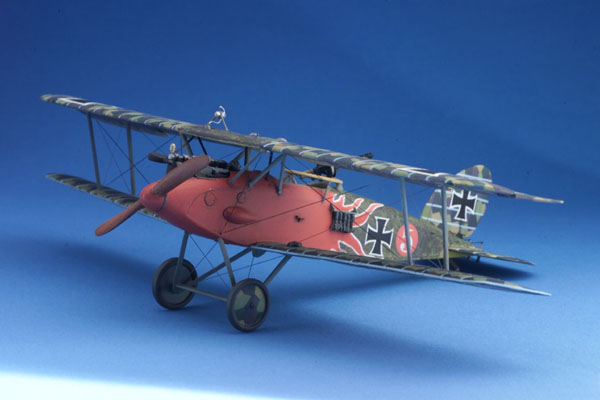
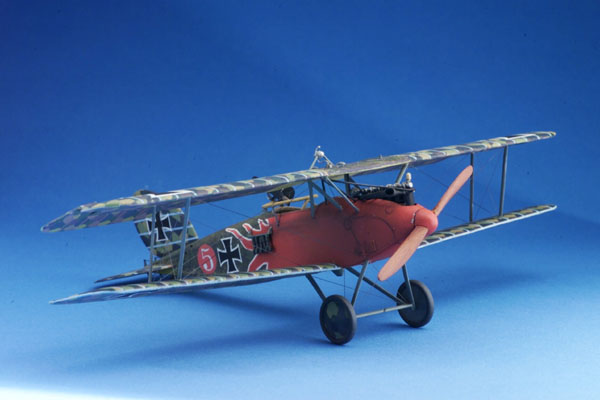
    Building the Skytrex Halberstadt CLII.

    This was a simple build excepting that no propeller is supplied with this kit so I made my own.


    Click image for larger version. 

Name:	DSC_1154.jpg 
Views:	127 
Size:	83.7 KB 
ID:	32945
    1. As usual clean off the flash. This particular kit was quite a clean one.
    2. Clear out the fixing holes with an appropriate drill and test fit the struts etc. I also drilled out for the flight peg at this stage so that I could mount the plane on my painting stand.

    Click image for larger version. 

Name:	DSC_1159.jpg 
Views:	21 
Size:	66.4 KB 
ID:	43045

    3. Print out, draw up, and cut out the wing decals, tail decals and wheel decals if required.

    Click image for larger version. 

Name:	DSC_1163.jpg 
Views:	21 
Size:	108.4 KB 
ID:	43047

    4. Glue in cabine struts the correct way round. Do the back set first, using the top wing as an alignment jig. Then once set, add the single forward strut in a similar manner.

    Click image for larger version. 

Name:	DSC_1155.jpg 
Views:	21 
Size:	73.7 KB 
ID:	43043


    5. Next put in the main struts and using the top wing again to get the alignment correct.

    Click image for larger version. 

Name:	DSC_1157.jpg 
Views:	126 
Size:	78.5 KB 
ID:	32947

    6. Then set up the plane for spray painting the white undercoat.

    Click image for larger version. 

Name:	DSC_1162.jpg 
Views:	21 
Size:	84.7 KB 
ID:	43046

    7. Spray paint undercoat.

    Click image for larger version. 

Name:	DSC_1165.jpg 
Views:	20 
Size:	81.2 KB 
ID:	43048

    8. Disassemble wing members, but not cabines.
    9. Paint all parts not being decaled. Start with the hand painted camo. Colour test against the printed camo and try to get the dappled effect of the original. I used a foam eye makeup applicator to get the sponged on effect.

    Click image for larger version. 

Name:	DSC_1166.jpg 
Views:	120 
Size:	82.2 KB 
ID:	32952

    10. Next paint the rest of the body of the aircraft, pilot wheels and struts etc.

    Click image for larger version. 

Name:	DSC_1168.jpg 
Views:	20 
Size:	78.8 KB 
ID:	43050

    11. Decal the bottom wing and tail, using Micro set to aid the positioning and adhesion. After ten minutes apply Micro sol to contour your decal to the model.

    Click image for larger version. 

Name:	DSC_1199.jpg 
Views:	20 
Size:	79.7 KB 
ID:	43051

    12. Clear out the strut holes where they are covered by the decals. Then fit the main struts in pairs, using the top wing as a jig once more. This time glue them in place.

    13. Once set, glue on the top wing.

    14. Invert the plane and assemble and glue the undercart.

    Click image for larger version. 

Name:	DSC_1201.jpg 
Views:	20 
Size:	76.7 KB 
ID:	43053

    15. Allow to set and then apply any insignia using the Micro set products as before.

    Click image for larger version. 

Name:	DSC_1203.jpg 
Views:	21 
Size:	76.1 KB 
ID:	43054

    16. Allow to dry overnight and varnish to taste.
    Click image for larger version. 

Name:	DSC_1204.jpg 
Views:	20 
Size:	71.4 KB 
ID:	43041

    The decals used on this model were APC. They are very fine in texture and show up all the underlying detail very well but because of this tend to wrinkle if overworked.They also loose colour if the top surface gets wet, so I would not recommend them unless you are an expert decaler.

    Rob.
    Attached Thumbnails Attached Thumbnails DSC_1154.jpg   DSC_1157.jpg   DSC_1166.jpg   DSC_1200.jpg   DSC_1155.jpg  

    DSC_1159.jpg   DSC_1162.jpg   DSC_1163.jpg   DSC_1165.jpg   DSC_1168.jpg  

    DSC_1199.jpg   DSC_1200.jpg   DSC_1201.jpg   DSC_1203.jpg   DSC_1204.jpg  

    Last edited by Flying Officer Kyte; 04-27-2012 at 12:09.

  2. #2

    Default

    That looks great. So tell me, what was up with the prop? Did it come as two separate blades that needed to be glued in place?

    Oh, never mind. I see the explanation at the top of the page.

  3. #3

    Default

    Another great 'how to', and with the red flames, Schlasta 26b is always going to be a favourite.

  4. #4

    Default

    Quote Originally Posted by Baldrick62 View Post
    Another great 'how to', and with the red flames, Schlasta 26b is always going to be a favourite.
    Thanks Baldrick. Don't suppose you have the namesof any pilots for that outfit?. I am getting fed up with having to ask Max to put unknown pilot on these cards.
    Rob.
    Last edited by 7eat51; 08-09-2013 at 11:27.
    "Courage is the art of being the only one who knows you're scared to death."

  5. #5

    Default

    The Mirage kit gives the names of one Schlasta 26b crew, and it's even for the same aircraft ID number. http://www.gdkits.com/images/10_MIR-48136_L.jpg

    It's Pion. Paul Schwarze (pilot) and Uffz. Franz Schumm (observer). FYI longform that's Pionier (Bavarian equivalent of Flieger, or Private rank for aircrew) and Unteroffizer (Corporal).
    Last edited by IRM; 01-31-2012 at 04:45.

  6. #6

    Default

    Quote Originally Posted by IRM View Post
    The Mirage kit gives the names of one Schlasta 26b crew, and it's even for the same aircraft ID number. http://www.gdkits.com/images/10_MIR-48136_L.jpg

    It's Pion. Paul Schwarze (pilot) and Uffz. Franz Schumm (observer). FYI longform that's Pionier (Bavarian equivalent of Flieger, or Private rank for aircrew) and Unteroffizer (Corporal).
    Thanks Iain.
    That will do nicely.
    Rob.
    "Courage is the art of being the only one who knows you're scared to death."

  7. #7

    Default

    That looks truely awesome Rob well done.

  8. #8

    Default

    Very nice and clean build - Amidst the discussion on Shapeways quality and other options. Just a note on the kit: Is it me or does the nose look rather pointy?

  9. #9

    Default

    Quote Originally Posted by GilmoreDK View Post
    Very nice and clean build - Amidst the discussion on Shapeways quality and other options. Just a note on the kit: Is it me or does the nose look rather pointy?


    Nothing a little milliput under the nose won't fix.

  10. #10

    Default Schlasta 26b Crews

    Sorry Kytie,
    I can give you individual names, and some crew pairings, but unfortunately not the serials or unit numbers of the aircraft the crews flew in S26b.
    BofB


Bookmarks

Posting Permissions

  • You may not post new threads
  • You may not post replies
  • You may not post attachments
  • You may not edit your posts
  •