


OTT DYM Mission 7 - Dit Fromage ! - 19th February 1916 AAR by Mike
Quite why the squadron was sending help to the French sector, at Verdun, wasnt clear to most of the pilots attending the briefing; those who would be involved that is.

Theres something big going on around Verdun and it appears the German top brass have beaten our boys to it, said Uncle to the gathering before him.
They were all aware that the Allies were supposed to be putting on a big show themselves in the near future and that it relied heavily on the cooperation between the French and the British in their respective sectors. But if the hun were going to interfere by putting on their own show, then things were likely to go horribly wrong.
So it has been decided that we need to know what is going on. Hence a couple of flights are being sent down to Verdun, ostensibly to aid our allies, but really because our own brass is wondering what the hell is going on!
There were a few rumbles from the group but mostly enthusiastic.
Itll give me a chance to see something new commented F/Sgt Charles Drake. Charlie was new to the squadron, a pilot replacement, but hed been an observer on a sector further to the north until now. Going south, would be new for him at least.
Appropriate, then, that youll be flying one of their aircraft, Charlie said Uncle. That was not so much to Drakes liking he wasnt fond of the Moraine Saulnier Type N and hed been looking forward to having a go in one of the squadrons DH2s. Sadly, however, a few too many of those had recently been shot up badly and still needed some repairs.

You and F/Sgt Lee will both be flying Moraines and Im putting F/Sgt Roe in charge of the three of you keep you lads together eh! And Henry has been doing particularly well lots of experience now eh Henry?
Yes, sir answered a none too certain F/Sgt Henry Edward Roe, who had only been out at the front himself, as a pilot, for the past six weeks or so. But, he was still alive, so that had to mean something. And he did feel a kind of pride at being given this opportunity.
The rest of you will fly DH2s! Thats Roe, leading B flight and Boots, and Fletcher with Lt Taker as flight leader in A flight. Any questions?
So it was that the following morning, 24th February 1916, early, but not so bright, as the clouds and mist were rather low for comfortable flying, and after an uneventful flight south, to a temporary airfield near Verdun, they all found themselves listening to French being gabbled all around them.
Lt Mick Evan Taker understood French reasonably well, when spoken by the officers, but there were other ranks there, from Britanny and Normandy, who spoke a mixture of French, Breton and Gallo, and they could not be understood, even by their own officers half the time.
We ave to go now said one of the French officers to Lt Taker. Orders, you understand!
Of course, but what do you want us to do?
You do nothink, understand? Not unless Mon Capitaine Rix Aster tells you. OK? Cest bon, non!
Non, cest ne pas bon, mais nous n'avons pas le choix . I suppose. Said Taker rather ungraciously. He guessed his French hosts were being rather over protective. Either that or they were none too pleased at this group of allies poking their noses in, where they were not really appreciated.
And off they all went, every one of the French escadron aircraft. Not a one left standing on the airfield. So the Bulldogs waited and waited and got bored!
Until, suddenly, as if from nowhere, Mon Capitaine Rix Aster appeared, waving and gesticulating in most Gallic fashion - You ave to go. Vite, vite why are you still ere?
Go, go where? asked Taker, the others being still too awestruck by the unfamiliar arm waving to notice what this powerful looking little frenchman had said.
You go to Douaument, vite, vite! Ils font les photos. Les Bosch. Cest mauvais, tres mauvais. Not good. You stop them. Mon Dieu tu es toujours là. Tu dois partir, go, go, go.
OK chaps, the heat is on*! Apparently the hun are over Fort Douaumont at this very moment, taking reconnaiscance photographs. Our host is most unhappy about that and wants us to deal with them. Just a couple of scouts and a two seater, by the sounds of it. But better safe than sorry. Ill take A flight ahead; Henry, I want B flight to follow after 5 minutes or so and cover our backs. Understood?
Understood, sir!
Fort Douaumont
Fort Douaumont was the largest and highest fort on the ring of 19 large defensive works which had protected the city of Verdun, France since the 1890s. By 1915, the French General Staff had concluded that even the best-protected forts of Verdun could not resist bombardments from the German 420mm (16.5 in) Gamma guns. These new super-heavy howitzers had easily taken several large Belgian forts out of action in August 1914. Fort Douaumont and other Verdun forts were judged ineffective and had been partly disarmed and left virtually undefended since 1915. Wikipedia.


The reports had been accurate, up to a point. True enough, a German two seater, an Albatros C1, had approached Fort Douaumont, under the early morning cloud cover, escorted by two Fokker Eindekkers. Their purpose was fairly obvious, the taking of reconnaisance photographs prior to some kind of planned assault. After all, the Germans had started their attack on Verdun just two days ago. The Fort of Douaumont, lying as it did on high ground, was an obvious target, but the Germans wanted to know if it would be a hard nut to crack, or easily taken!

Creeping in low, they had not been spotted or heard until they were almost over the fort, at which point the alarmed defenders sent up a warning flare. It was that which had attracted the attentions of our erstwhile ally, Mon Capitaine Rix Aster.

Just as soon as the enemy aircraft had been spotted, two anti aircraft guns had opened up, almost in a panic and they missed. Both of them missed. One cannot blame them, the German attack on Verdun had more or less caught everyone with their pants down, so the forts defenders can hardly have not had a case of the jitters. However, that was enough to remind the hun interloppers that they were not going to have an easy time of it; not that they had expected any such thing, and they veered to the south. The observer on the Albatros busily taking photos all the while.

A fatal error for the rather slow Albatros as it turned out. In flying south they presented first the defending machine gunners, then the rapidly reloaded AA guns, with a perfect target. One they duly dispatched with some alacrity!


First the forts machine guns opened up on the Albatros, seriously wounding the aircrafts observer, Ltn Albert Mendel, who bravely continued taking his photographs none-the-less. Then Both AA guns, having fully reloaded, fired again and with an awfully loud crack and lots of black smoke, one of the shells exploded close enough to the Albatros to destroy its ability to fly further. The pilot, Obltn Hermann Lux, struggled valiantly to save the ailing beast, but to no avail. The bird plunged earthwards, screaming in protest all the while, until it landed with a crump on the hillside beside the fort. Whereupon some of the French defenders, rushed out and captured both of the wounded and now dazed, Germans. The war was over for Lux and Mendel!
Meanwhile, one of the machine guns in the fort had also scored a telling hit against an Eindekker. A fire broke out on the latter aircraft things were definitely not going according to plan for the Germans.
At this point a few more enemy aircraft turned up. Seemingly, the Germans were as anxious to obtain information about the forts defenses as the defenders were to prevent them from doing so. This looked rather ominous for the French occupants of Fort Douaumont, as they were well aware of how weak those defenses were!
A two seater, together with its escort, was spotted flying towards the southern part of the fort, again with photo reconnaisance obviously in mind.

What the defenders had not yet spotted, however, were two further aircraft approaching towards the northern sector around the fort, the heavy cloud cover working in favour of the aircraft crews and still hiding them.
In any case, neither pair was of immediate concern, given that the vengeful escorts to the now destroyed Albatros, were determindely out to exact retribution. In they came, with guns blazing. And in the case of one of them, with the aircraft blazing too!

Ltn Josef Jacob was rather distracted by the flames that threatened to engulf both his aircraft and with it himself, if he did not carefully apply all of his experience to thwart that eventuality. So it comes as no surprise that he did not unjam his gun in time to fire shots on the French gun emplacement and therefore did no damage at all. It is perhaps rather more disappointing, from the German perspective, that the shots from Ltn Hans Leptien also failed to find a mark. And just to demonstrate how difficult it is to use machine guns under such circumstances, both of those fired by Frenchmen, at this point, failed to do anything other than minor damage, in addition to which, one of them jammed!
And all the while, the other Central Powers combatants crept ever closer to their respective objectives.


For the Germans, the outcome of that brief tussle was reasonably successful. Leptien finally found the range and his second burst of fire skipped across the broken ground inside the fort before severely stitching the entire area around one of the gun emplacements and completely destroying it. One all, so to speak!
But the unfortunate Jacob, was not so favoured. Although he was managing to keep the flames on his aircraft under reasonable control, another serious threat was looming large.
Having been unfamiliar with the terrain features, Lt Mick Evan Taker had led his flight of DH2s slightly astray, resulting in his approach being from the south west, rather than the anticipated north east. No matter, as it turned out. Every cloud has a silver lining it is said, and there were plenty of those about right now!

So into the fray he and his flight tumbled, Taker opening up at long range, more to test his guns than any serious hope of hitting his prey, Ltn Josef Jacob. Needless to say, he missed.
Ltn Hans Leptien was also fairly lucky at this stage, as the sole remaining machine gun in the fort did minimal damage to his rear end, despite the proximity of said empinage to the French gun.
But the luck wouldnt hold for long. Whilst an Aviatik CI and its Fokker escort continued undetected around the north side of the fort, suddenly all hell was let loose on the doomed Jacob and his Fokker Eindekker. Still distracted by the flames licking his shoulders, Jacob desperately tried to return fire effectively, having unjammed his gun under very difficult circumstances, but he was unsuccesful. Lt Taker and his port side wingman 2nd Lt Bo Fletcher, from down under, both opened up at close range and effectively detroyed the burning Eindekker on the spot.


Jacob and his machine fluttered, almost gracefully, to the earth, where the rather scorched pilot, Ltn Josef Jacob, was also captured by gleeful French defenders and dragged groggily to safety, whilst the remains of his once fearsome chariot burned ever brightly in the gloom under the clouds. In his half conscious mind he thought he could hear mention of Icarus and wondered why his French rescuers were laughing!
Ltn Hans Leptien had had no choice but to scurry off to one side and out of harms way, temporarily, since his gun was jammed now too!
Next the battle for photgraphs really started in earnest. Those already taken by Ltn Mendel were destroyed in the crash of the Albatros and would never inform German HQ. Enter Two more German two-seater aircraft. To the south of the fort an LVG, escorted by a Pfalz Eindekker; to the north, still creeping along undetected, the aforementioned Aviatik, together with its escort.

All four German aircraft took advantage of the confusion now apparent over the fort itself. The British attackers were intent on detroying the sole remaining green eindekker, flown by Ltn Hans Leptien, whilst the latter was still trying with all his ferocity, to unjam his gun. That gave the other German pilots and observers a few vital seconds to attempt to complete their objectives. So they flew on, ever closer and apparently still unnoticed. Click, click went the cameras.


First Ltn Karl Niederhoff was able to fly the LVG close enough for his observer, Ltn Alfred Osterroht, to get some good photographs of the area south of the fort. At the same time, he saw, with some concern, three more British or French aircraft flying into the attack from the west. Another DH2 and two Moraines by the looks of them! That was not good news at all.
Then as the pairing of pilot, Fwbl Robert Janzen and observer, Ltn Johannes Mesch, finally approached the target area north of the fort, they were noticed!

The LVG by one of the original DH2 attackers and the Aviatik by the forts remaining gunners. The LVG was caught at short range and took quite a bit of damage, but fortunately, for them, not enough to seriously impede their progress. Their escort, immediately peeled off and counter attacked, doing his job to perfection. But it would cost him dearly because, as a result, his engine was badly damaged.
Meanwhile, Hans leptien was also doing an important job trying to keep the British newcomers occupied, their opening shots going well wide of the mark.
The AA inside the fort was also suffering from poor aim against the Aviatik, but by then the black puffs of smoke had attracted the attention of a couple of DH2s which promptly swung northwards, towards the Aviatik. Time for its escort, the EIII flown by Obltn Gisbert Habich, to start earning some pay!

Things hung in the balance, as Niederhoff made what was to be an important decision for his side. He left his escort behind and swinging well south, to try and avoid the mess that was the current conflict in the skies above Fort Douaumont, he would try to circle around and come at the objectives again, this time from the west. He just hoped that Janzen, in the Aviatik, could complete the job on the north side of the fort.

By the looks of things, his colleagues had already been close enough to do just that, but they both still had to survive the attentions of half a dozen enemy scouts!
Janzen was of like mind. He had, in fact, succeeded in getting close enough for his observer to get some good shots of the northernmost target location. Now he would swing west and return from there, east towards his other objectives and home. Only, unfortunately for him, or fortunately for the Bulldogs, depending on your point of view, the Aviatik was in the sights of a couple of British scout pilots, that proceeded to give him a hard time, notwithstanding the effects of the return fire, given to them by his observer.


Meanwhile, Ltn Christian Koch, in the Pfalz, seemed to be taking on the other half of the British attackers, plus the remaining AAMG position in the fort, all on his own! How fortunate he was, that the AA gun missed and that at least one of his attackers was foiled in his attempted murder by a jammed gun! But how unfortunate he was when his aircraft caught fire never-the-less, just as Lt Phil Boots moved in for the coup de gras.

Ltn Mesch, in the Aviatik, trying hard to fend off the unwanted attentions of two aggressive DH2s, saw the Pfalz go down in flames and shuddered. Just as his aircraft was attacked and he had to think of nothing else but the need to clear away the offending articles, as quickly as possible! Gun jams helped as often as they hindered, of course, and in this case it was his British adversary who suffered the inconvenience! With one parting shot that missed, his pilot was able to detach them from pursuit, if only temporarily. A relief, yes, but then it allowed him a moment he didnt want, to witness the demise of the Pfalz. Ltn Koch went down in a blaze of glory, or so he thought. And once more, the defenders of Fort Douaumont rushed forward eagerly and captured him before he could burn to death.

Why did these things always seem to happen so quickly? One second they were all there, contesting the right to control the heavens. Next thing you know, half of your support was gone and your friends were falling from the skies like so many flares.


Not a pretty sight. Not unless you happened to be Lt Phil U R Boots, that is. He, naturally enough, was both pleased with his success and relieved that he had not suffered a similar fate yet. His comrades were having a bit of a field day it seemed. But the enemy still occupied contested air space and they were still taking those damned photographs. The job was far from successfully completed.
And so, for a brief moment, we move to the sidelines, where F/Sgt Jo Lee was attempting to chase down an Eindekker; the green one mentioned earlier, and 2nd Lt Bo Fletcher went off on a jolly after another Eindekker, this one clear doped linen, before becoming disoriented and subsequently lost, for much of the remainder of this action it happens!
First the contest between Jo Lee and Christian Koch.

Clearly, neither pilot relished the outcome, although the greater discomfort was undoubtedly Lees. It will be seen, soon, that Koch then got the better of Lee by turning about in the fashion now referred to as Immel turning, or such like, before both pilots saw the sense in retiring. The one being wounded, the other having a failing engine.


We shall see neither again in this contest between knights of the sky.
As for Bo Fletcher and his petit voyage to nowhere in particular well be patient, please. You will see him again a little later.
Thus we return to the exploits of the LVG and its crew of Karl Niederhoff, in the driving seat, and Alfred Osterroht, observing, shooting and taking photographs, not necessarily in that order. You will recall that the LVG was being taken south then west, in a circuitous route, in order to avoid the worst of the muddled exploits of the scouts in combat.

We catch up with it on its return journey eastwards, heading for Fort Douaumont once again and merrily involved in a photo shoot, on behalf of the imperial forces of Kaiser Wilhem II, all the while.

It is missed by Archie and then has the audacity to inflict a defeat on one of His Majesty King George Vs DH2 pilots, when Ltn Alfred Osterroht hits and wounds the illustrious leader of Bulldog A flight, Lt Mick E Taker.

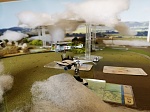
An aerial view clearly shows this in progress, whilst a quick glance at the top of the same aerial shot will show, once more as promised, our friend Bo Fletcher on his wandering course! Poor Bo is in for some ribbing methinks. For his aid in preventing any photographs leaving the area is sorely needed.
The RFC forces are in disarray as the LVG approaches its all important final run.
Not so the Eagles. Obltn Gisbert Habich, having avoided Fletcher, is now available to distract our merry band of RFC brothers. Just as the forts last machine gun chokes on its own ammunition, attempting to blow up the LVG on its approach, which incidentally does not prevent Alfred Osterroht taking some more excellent photographs of the western most target area, Habich opens up at long range on none other than F/Sgt Roe. Habich getting the better of the exchange, but more importantly wooing the RFC away from the LVG, now heading for the central fort target area!

And Bingo! The LVG makes it to the right place and its observer takes his final two photographs (which now makes six two of the southern target area, two of the western target area and now two of the fort interior).

Two more of the eastern target area and he will have done the best job possible for his commanders. Fort Douaumont is not heavily defended and the German High Command needs to know. Will they manage the last two photographs and more importantly, will they escape east and back to their barn?
I have to say, I hope not!!!!
And throughout this latest act in the proceedings, Gisbert Habich had played an important role. Roe failed to take him down, following which Charlie Drake missed his opportunity too, although he did plant a few holes in the EIII. Habich had succeeded in distracting the RFC pilots from the real danger posed by the LVG. It was time for Habich to make his way eastwards, towards friendly territory.

The LVG made good use of the distraction and weaved its way gradually towards the east. Osterroht its observer, had time to look around now and he could see the Aviatik coming towards them from the west. Obviously it too had succeeded in evading the British and had crept west before turning back, with the intention of capturing more images of Fort Douaumont on the way home.

But it ran into serious trouble when it was pounced upon by a couple of RFC machines, one of which was the new boy Charlie Drake, This time, despite the fire from the LVG which thumped into his Moraine from behind, Charlie successfully hit his target and yet another German aircraft caught fire.

And once again, as if the fire were insufficient cruelty, F/Sgt Roe about turned and came at the burning Aviatik head on. A couple of quick bursts at close range and no matter the first missed. The second hit something vital, which when added to the flames, caused an explosion and down she went, just like the others. There was nothing Niederhoff or Osterroht or Habich could do about it. The two images of the northern target area were consumed in the fire and they were down to two surviving aircraft on this raid. The chase for them was on!

With yet another whoop of disbelieving joy, a few Frenchmen left the comparative safety of the fort and captured yet another german pilot. But there was no sign of the observer that must have been in the aircraft with him. Hiding in a ditch and sheltered by overhanging bushes, not thirty yards away, Ltn Johannes Mesch lay very, very still and prepared himself for a long wait until darkness came.
Habich and Niederhoff flew their aircraft eastwards, weaving as they went, with Niederhoff straightening out only briefly, to allow Osterroht that last, successful, opportunity to take two more photographs of the eastern target area. Only one DH2 was close enough to them to give chase and that was the wounded Lt Taker.

Taker fired at the retreating two seater, at long range, in desperation and missed. His gun jammed and with it he lost his last hope of preventing any information from reaching the enemy.

The two German aircraft, together with their vital information, were last seen climbing into the clouds that had hung there solemnly all day.

They had completed their mission and they had escaped. But they left behind some good friends!
As for our boys in the RFC. They aquitted themselves admirably. They shot down three enemy aircraft between them and had, as far as they were concerned, helped the French in this sector as much as they could have been expected to, without the loss of a single man or aircraft in the process. They were content and had some good reports to submit.
They were not to know, or if they did, would not take responsibility, for what was to happen as a result of those images reaching German High Command. The subsequent loss of Fort Douaument, on the following day, was down to the French, who had already partly disarmed it themselves.
On 25 February 1916, Fort Douaumont was entered and occupied without a fight by a small German raiding party comprising only 19 officers and 79 men. The easy fall of Fort Douaumont, only three days after the beginning of the Battle of Verdun, shocked the French Army. It set the stage for the rest of a battle which lasted nine months, at enormous human cost. Douaumont was finally recaptured by three infantry divisions of the Second Army, during the First Offensive Battle of Verdun on 24 October 1916. This event brought closure to the battle in 1916. Wikipedia
The end
Butchers Bill
Entente
Lt Mick Evan Taker (DH2) / RTB / WIA / 1 kill
Roll 2D6 = 10 1 WIA + 1 RTB = 10 All well when you land well.
Result All good
2nd Lt Phil Ulyses Robert Boots (DH2) / RTB / 1 kill
Result All good
2nd Lt Bo Fletcher (DH2) / RTB / No kills
Result All good
F/Sgt Henry Edward Roe (DH2) / RTB / 1 kill
Result All good
F/Sgt Jo Lee (Moraine Saulnier type N) / RTB / WIA / No kills
Roll 2D6 = 9 1 WIA + 1 RTB = 9 All well when you land well.
Result All good
F/Sgt Charles Drake (Moraine Saulnier type N) / RTB / No kills
Result All good
Central Powers
Two seater crews
Obltn Hermann Lux PB (pilot Albatros CI) / SD EXP ET / No kills
Roll 2D6 = 10 3 EXP = 7 Injured Skip 1D2 = 3 Skip 1 scenario.
E&E
Roll 2D6 = 4 1 WIC 1 BEL = 2 Captured! The war is over for this pilot
Result - Captured
Ltn Albert Mendel OB (Observer Albatros CI) / SD EXP ET / WIA / No kills (Took two photos which were destroyed in the explosion).
Roll 2D6 = 9 3 EXP 1 WIA = 5 Injured skip 1D3 = 6 skip 3 scenarios.
E&E
Roll 2D6 = 5 1 WIA 1 WIC 1 BEL = 2 Captured! The war is over for this pilot
Result - Captured
Fwbl Robert Janzen (pilot Aviatik CI) / SD EXP FLM ET / No kills
Roll 2D6 = 10 3 EXP = 7 Injured Skip 1D2 = 1 Skip 1 scenario.
E&E
Roll 2D6 = 5 1 WIC 1 BEL = 3 Captured and escaped! Skip 1D3 = 3 Skip 2 scenarios
Result Skip 2 scenarios
Ltn Johannes Mesch (Observer Aviatik CI) / SD EXP FLM ET / No kills (Took two photos destroyed in fire)
Roll 2D6 = 11 3 EXP = 8 Injured Skip 1D2 = 4 Skip 2 scenarios.
E&E
Roll 2D6 = 8 1 WIC 1 BEL = 6 In hiding! Skip 1D2 = 1 Skip 1 scenario.
Result Skip 2 scenarios
Ltn Karl Niederhoff (Pilot LVG CII) / RTB / No kills
Result All good
Ltn Alfred Osterroht (Observer LVG CII) / RTB / No kills (Took eight photos including two of Fort Duoaumont)
Result All good
Scouts
Obltn Gisbert Habich (Fokker EIII) / RTB / No kills
Result All good
Ltn Joseph Jacob PB ( Fokker EIII) / SD FLM ET / No kills
Roll 2D6 = 7 2 FLM = 5 Injured skip 1D3 = 5 skip 3 scenarios.
E&E
Roll 2D6 = 6 1 FLM 1 WIC 1 BEL = 3 Captured and escaped! Skip 1D3 = 2 Skip 1 scenario.
Result Skip 3 scenarios.
Ltn Christian Koch ( Pfalz EI) / SD FLM ET / No kills
Roll 2D6 = 7 2 FLM = 5 Injured skip 1D3 = 2 skip 1 scenarios.
E&E
Roll 2D6 = 6 1 FLM 1 WIC 1 BEL = 3 Captured and escaped! Skip 1D3 = 6 Skip 3 scenarios.
Result Skip 3 scenarios.
Ltn Hans Leptien EKII; PB (Fokker EIII) / RTB / No kills (Destroyed one AAMG position in Fort Duoaumont)
Result All good
Victory points
Entente
Two seaters shot down - 4VP
Scouts shot down 2 VP
Total: 6 VP
Ce ntral Powers
Compass Photos taken 6 VP
Fort photos taken 4 VP
Total: 10 VP
A clear victory for the Central powers.
Notes:
I was permitted to fly two aircraft, so as a Bulldog, I chose two DH2s. However, to make more sense of things thereafter I decided that the movement of german escort scouts would mirror those of their wards until first contact was made on either the escort or its ward.
I noted after a few photos had been taken that the LVG CII was a bit ahead of its actual introduction date. So I assumed it to be a trial aircraft and only armed it as for the other two 2 seaters i.e. with a single rear facing machine gun in the hands of the observer. Hope nobody finds that unacceptable.
Re altitude: I sort of played it and sort of didnt. Once the German aircraft had reached altitude 2, for more effective photography, I kept them there. I didnt then give the RFC aircraft any height advantages when firing took place. I just assumed that either the FRC planes descended to get a better shot or that the German aircraft climbed to nullify the effects of height. It saved me the bother of constantly adjusting the number of pegs in any one peg column. With so many models on the table, quite frankly I couldnt be a**ed sorry.
The mission took about four days to play out, which is entirely my own fault for taking the cloud cover literally and adding that complication to the 3D effects.. A real challenge to my temperament I have to say. But Im glad I stuck it out. The mission was just great.
I dont think the pics are quite up to standard and if the story line seems rather hurried and not that well written, well, you are correct. Sorry, but things in our household have been a bit fraught recently, what with illness, operations and the need to spend copious hours grandchild minding (which I love actually) And then, as I started this AAR, Yon and I found ourselves having to prepare a hasty trip to Holland following the demise of an aged uncle. Sad, but he had a really good innings.
One last point. Reading it through myself, its noticeable that it seems to be mostly from the point of view of the Eagles
So, no more winging Ill post this in haste and hope for the best.


 Reply With Quote


Bookmarks