
Balloons / Drachens done - except a few touch ups;


Balloons / Drachens done - except a few touch ups;


Very impressive! The fins seem a little bit smaller than on the Nexus ones, were there different versions of the Caquot M in action?
One more and you can do this:
Thanks. The brown one just needs a few touch ups of ink wash on a few seams. The yellow one needs something but I haven't decided what as there are options that could end up making it worse instead of better - I'm thinking of a very light dry brush of light yellow-yellow ochre...but, oh so, light. As for differences with the Nexus, I can't tell as I don't have a Nexus model - hence having to paint up ones.Originally Posted by Karo7

I google images but it was hard to tell as any difference could just be the angle of the fins with respect to the camera.
Different versions in action? They were made by more than one country and more than one manufacturer, I can't imagine they all came out the same. From the google real war images one could think there were some difference, but again it could just be camera angle.
Maybe the designer (RAF) can answer the question.
FYI - I tried this out with just a primer of gesso, a medium shade of the final colour, a burnt umber ink wash, a lighter shade of the final colour and a final burnt umber ink wash. I was okay with not doing the diluted glue or other routes as I didn't care if the balloon had a fuzzy 'shapeways' surface. It was an opportunity to try out the WSF material.
Ha! Ha! You forget I have 2 Valom models on the table and 12 more (6 kits) ordered. And...Easter is getting very close now.
I have an idea for the yellow balloon - a light brush using my artists oils. I find dry brushing with acrylics over large areas a real pain, but oils are very nice to work with plus oil over acrylic is okay (not vice versa). It will take a week or two to dry but the oil will give it a nice egg shell sheen. And if it doesn't look good I can just wipe it off.


Very well done. In my research I have discovered there is a wide range of size mostly due to inconsistent inflation. Some are barely able to stay aloft, fins even sag flat.
I don't like drybrushing, as it is a very time consuming method, when done thoroughly to achieve a subtle effect. I don't like the lag of control, too. I only use dry brushing for chainmail and some armour parts. Even on hair I avoid drybrushing and instead use layering of paints.


Both of these look lovely, Paul! What a nice addition to your WoG gaming options
All the best,
Matt
I totally agree with you when it comes to drybrushing with acrylics. You have to get the load on the brush just right and apply it just right. If you're too light in your application you can apply some more in the hopes of getting it right but more likely you f... it up; and if you apply it to heavily then you're scuppered because you can't move it around. It's different with oils you can thin it on the object if it's too heavy, move it around and just generally play with it. ETA: I should add that what I described with oils isn’t dry brushing but the application of a very dilute coat of oil which I find too watery with acrylics. So if using acrylics I’d try to dry brush but much easier to work with a thinned oil paint.
For the yellow balloon I find the contrast too much for my taste. If I apply a thin coat of a soft yellow-orange colour (if you paint Napoleonic French dragoons or chasseurs it would be a facing colour called 'aurore') that would be perfect. I’ve cheated a bit in the photo since I’ve applied a mild warm filter so that it show the colour I’m looking for with the yellow one.
Last edited by ShadowDragon; 04-11-2019 at 17:46.
Yes, indeed. Now I can go back and play Mission 1 of the latest Over the Top campaign, Daring Young Men. I'm also, in parallel doing the first OTT campaign and have stopped at Mission 5 which has one balloon.
So any slight adjustments of hue for the yellow balloon will need to wait for me to do mission 1 of Daring Young Men. After getting these done well enough for a game I'm not waiting two weeks to play mission 1.
Very nice Paul. Looks like the guess primer did a good job. I'm a WSF (or whatever its called now) guy so will have to give it a try. REP gun jammed at the moment.
Really sharp looking gas bags.
Here's to them what are like us. Damn few and they're all dead.


Great paint jobs on those gasbags.
The Eindeckers are non too shabby as well.


Very nicely done!
My models were done from some drawings in Aviation magazine in December 1919 (link). It's an interesting article if you're interested in the details of a WWI balloon.
I'm sure there were a lot of variations since there was no single manufacturer. According to the old Blandford Press book Balloons and Airships, the first two Caquot types were the 'L' and 'M' (no sizes given, but the Aviation article gives the M at 930m³), but the sizes were later standardized as the 'P' (750m³), 'P.2' (820), 'M.2' (930), and 'R' (1000), and it wouldn't surprise me if the proportions were a little different for each size. If you go looking for photos, though, we're lucky when they identify it as a Caquot type, much less the subtype.
Albert Caquot himself is interesting -- beyond balloons, he designed a lot of large scale engineering projects, including the internal structure of the famous spread-armed "Christ the Redeemer" statue near Rio de Janeiro.

nice!
Thanks to everyone for their compliments.
Peter. I wouldn't necessarily give the gesso full passing marks. Depending on how the WSF print turns out and your desired effects you might still want to prep with something else before applying the gesso. On a closer look at the yellow balloon the issue I need to fix isn't the colour which is okay but that the final burnt umber ink was went into the small indentations in the surface and made it look muddy. It's okay with the brown one because the overall colour is burnt umber based.


Well done, Paul!From where did you obtain the bases for those balloons, please?
Thanks. The bases are from Litko - their Blimp flight stand with one of their 3mm flight peg toppers on top of that to hold the 3mm flight peg glued into the hole on the bottom of the balloon. I might add another peg topper to help keep the ballon a tiny bit more upright.
The Litko blimp stand - note (see the following photo) that the stand is smaller than the WoW card (and I presume the Nexus stand)
https://litko.net/collections/miniat...p-flight-stand
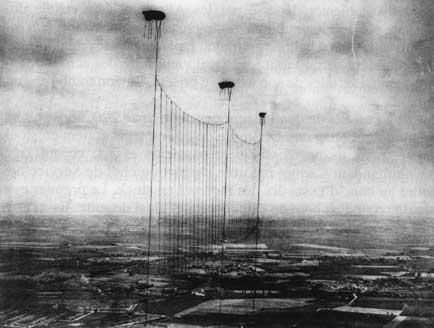
The gas bags deployed for the OTT Daring Young Men - Mission 1. I've touched up the ink wash in creases where the original wash didn't take and applied a wash of acrylic wash of cadmium yellow with a tiniest touch of cadmium red and a small amount of yellow ochre to tone down the colour so that it ended up as a mustard colour wash. I went with this instead of oils because yellow is opaque in oils but translucent in acrylics - unless you add white which I do when I want a vivid yellow. Here I wanted the shady parts to come through. Good enough for shooting down.


Just picked up on this one. Good looking balloons / drachens Paul.
Thanks. Looking forward to seeing your Re7(s) painted up.
Thank you for the information about Litko, Paul.
 Posting Permissions

 Reply With Quote


Bookmarks