Ares Games
Results 1 to 21 of 21

Thread: Caproni Ca.40

  1. #1

    Default Caproni Ca.40

    After a couple of balloons, now it's time to try something heavier than air.

    So I take my copy of "Flight of the Giants" looking for something big.
    My first attempt with a small airplane doesn't satisfy me too much.
    My Ansaldo A1 is too thin and fragile (link).

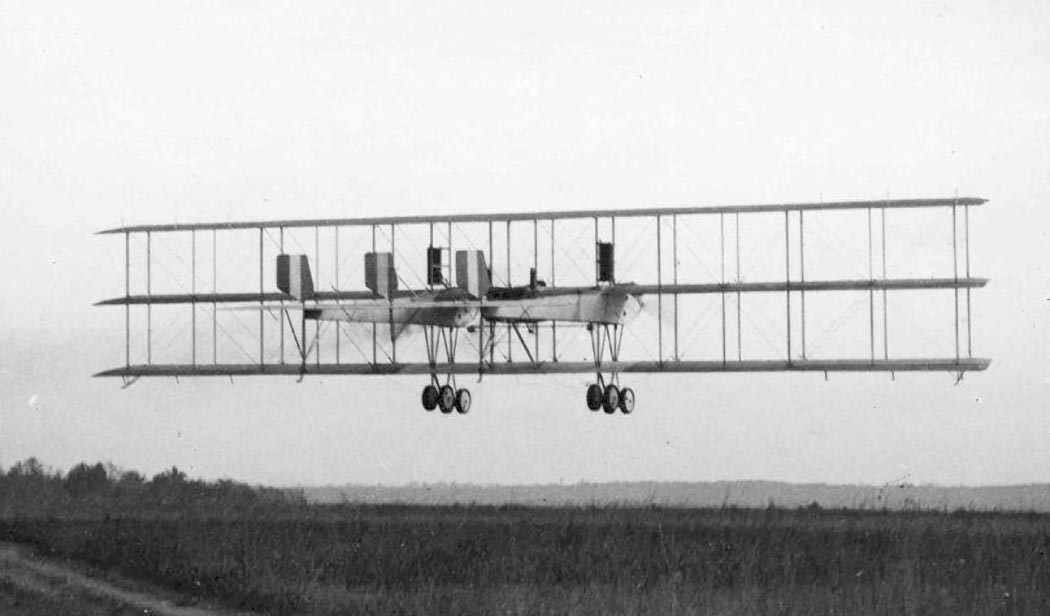
    Caproni Ca.40 appears a good choice: it's big enough, ...and Italian

    So I started from here:

    Click image for larger version. 

Name:	Caproni-Ca.4-project.jpg 
Views:	133 
Size:	140.9 KB 
ID:	234000

    I opened the image with the great free software Inkscape and I vectorize the bitmap with only few click.
    Than I imported in Rhino and rescale. After a bit patience...

    Click image for larger version. 

Name:	Caproni-Ca.4-rhino.jpg 
Views:	135 
Size:	134.0 KB 
ID:	234001

    It's time to prepare for the print in two version: assembled and disassembled.

    Click image for larger version. 

Name:	Caproni-Ca.4-print.jpg 
Views:	132 
Size:	166.5 KB 
ID:	234002

    I'm testing the first way. If it will be ok I think that could be better and easier to print:

    Click image for larger version. 

Name:	Schermata 2017-10-02 alle 10.23.27.jpg 
Views:	131 
Size:	94.1 KB 
ID:	234003

    Now it's working. I keep you tuned.

    Click image for larger version. 

Name:	IMG_3105.JPG 
Views:	134 
Size:	96.0 KB 
ID:	234004

  2. #2

    Default


    utterly gobsmacked, I can't wait to see pics of the finished beast!

    Lest we forget

  3. #3

    Default

    Impressive Dino.

    Sapiens qui vigilat... "He is wise who watches"

  4. #4

    Default

    Noooo ! I crashed the Caproni Ca.40 removing the supports !!!

    One more time, it is a bit too delicate, but before start to redraw it, I'd like to test a "separate print" (the disassembled version).
    I promise: if it is just printable I'll share the file with all the community.

    At the beginning, I was really next to put all in trash, but I know, I need a lot of exercise with the paintbrush.
    So ....

    Click image for larger version. 

Name:	IMG_0685.jpg 
Views:	122 
Size:	156.9 KB 
ID:	234228

    Click image for larger version. 

Name:	IMG_0686.jpg 
Views:	121 
Size:	165.8 KB 
ID:	234229

    Here's a comparison with the little brother Ca.3.
    You have to use a lot of fantasy to immagine a good model
    ...the propellers are still missing....

    Click image for larger version. 

Name:	IMG_0687.jpg 
Views:	122 
Size:	177.1 KB 
ID:	234230

    Click image for larger version. 

Name:	IMG_0688.jpg 
Views:	120 
Size:	172.3 KB 
ID:	234231

    Please, be patient..... The next one could only be better !

  5. #5

    Default

    Never let a bad model or unused bits go into the trash. You never know what you might do with them.
    Karl
    It is impossible for a man to begin to learn what he thinks he knows. -- Epictetus

  6. #6

    Default

    Nice "recovery" with the bad one! That will be much fun to swap in when the good Ca.40 goes down.

    As a Shapeways modeler, I'm curious: what are the minimum wall thicknesses and wire thicknesses (like a strut) with that printer? How hard is it to remove the supporting material?

    (Shapeways has a black acrylate material that looks similar, but I'd never trust an untrained person to tell a support-structure from a wing strut that is supposed to be there.)

  7. #7

    Default

    My printer is a really cheap one. Less than 500 €.
    I use also cheap material (PLA) for the first tests: 48€ in a big roll of 2.3kg.

    For these reasons I print wings no thinner than 1 mm in the middle. But the theorically step in Z is 0.1 mm,
    so the wing-profile is really thin !

    Concerning the vertical structures I tryed 0.75 mm, but is not a good idea.
    At every layer the printer have to be really precise in movement to put another 0,1 mm on every columns,
    So I have two different way:
    1. print the structures separated, in horizontal. But I have to mark the position on the wings to facilitate the assembly operation.
    2. redraw biggest supports (1 mm could be ok). I have to double check the size of the Caproni Ca.3 ones.

    Concerning the support, I use Simplify 3D a really good software, in my opinion, because have a incredibly fine tuning parameters:
    - Support infill percentage is reduced at 20%.
    - The extra inflation distance is 0,30 mm.
    - I combine supports every two layers only.

    I print the airplanes slowly : 45mm/s raising a bit the temperature respect the suggested (210 °C instead of 200 °C).

    I'd like to keep the models light, so the infill is 10% only, with grid rectilinear and 25% outiline overlap.
    For this reason I raise the top and bottom solid layers at level 6. The outline/perimeter shell is 3.
    To keep the surfaces smooth I prefer a inside-out direction.

    I hope that my experience with all this boring settings could be useful !
    All are empirical, so I'm open to suggestion to improve them.

  8. #8

    Default

    Nice project.

    Delicate thing this 3D printing.
    Voilŕ le soleil d'Austerlitz!

  9. #9

    Default

    Update: I'm next to the goal.
    Stay tuned !

  10. #10

    Default

    That is strange !
    After few weeks, I noticed that my post last was lost....

    Here's some photo....

    Click image for larger version. 

Name:	McI2w1ll.jpg 
Views:	73 
Size:	51.9 KB 
ID:	238702

    I hope you like it.

    Click image for larger version. 

Name:	ttRkATAl.jpg 
Views:	73 
Size:	52.8 KB 
ID:	238703

    The most difficoult parts are the rudders and the propellers.

    Click image for larger version. 

Name:	tfVFvSBl.jpg 
Views:	73 
Size:	63.9 KB 
ID:	238704

    It is not difficoult to glue. I print a tool to allign the wings separators:

    Click image for larger version. 

Name:	KxHP9LLl.jpg 
Views:	74 
Size:	63.9 KB 
ID:	238705

    Next step: the crew !

    Click image for larger version. 

Name:	YNk4O8hl.jpg 
Views:	74 
Size:	60.0 KB 
ID:	238706

    I keep my first attempt for scenario...

    Click image for larger version. 

Name:	iy9c85xl.jpg 
Views:	74 
Size:	70.1 KB 
ID:	238707

    Enjoy !

  11. #11

    Default

    Quote Originally Posted by comPVter View Post

    Click image for larger version. 

Name:	iy9c85xl.jpg 
Views:	74 
Size:	70.1 KB 
ID:	238707

    Enjoy !
    I love the comparison. Great for scenarios.

    Sometimes our first mistake leaves us with something awesome!

  12. #12

    Default

    Could be a "crash landed" sceanrio, too.
    Voilŕ le soleil d'Austerlitz!

  13. #13

    Default

    Great job.
    Looks fantastic!

  14. #14

    Default

    Somehow missed this back in October; glad I looked now.

    Bang-up job on the second go-around. That's exactly why we make mistakes the first time around.

  15. #15

    Default

    Very impressive. I couldn't even begin to think about such a project, let alone complete it. Congratulations Dino

  16. #16

    Default

    If you like the model,

    Click image for larger version. 

Name:	uOrtfxDl.jpg 
Views:	48 
Size:	30.8 KB 
ID:	238847

    you can download and try to print it out for free

    https://www.thingiverse.com/thing:2606935

  17. #17

    Default

    Ciao !

    Have a look at this masterpiece:

    Click image for larger version. 

Name:	Rr8lHMLl.jpg 
Views:	38 
Size:	53.9 KB 
ID:	240181

    I found the picture here: http://yuripasholok.livejournal.com/5790900.html
    It's the Caproni Ca.43 in hydro version with torpedo.

    I really love it !

    It could be my next work :-D

  18. #18

    Default

    That's a work of art - What a remarkable beast !

    Sapiens qui vigilat... "He is wise who watches"

  19. #19

    Default

    Quote Originally Posted by comPVter View Post
    Ciao !

    Have a look at this masterpiece:

    Click image for larger version. 

Name:	Rr8lHMLl.jpg 
Views:	38 
Size:	53.9 KB 
ID:	240181

    I found the picture here: http://yuripasholok.livejournal.com/5790900.html
    It's the Caproni Ca.43 in hydro version with torpedo.

    I really love it !

    It could be my next work :-D
    That. Is. Incredible. Thanks for the link. Amazing work!

  20. #20

    Default

    That is nothing short of amazing.

  21. #21

    Default

    Absolutely stunning Thanks for sharing


Similar Missions

  1. CAPRONI
    By Baxter in forum Officer's Club
    Replies: 8
    Last Post: 05-16-2016, 10:49
  2. Caproni Ca.7
    By Пилот in forum WGF: General Discussions
    Replies: 2
    Last Post: 10-09-2014, 08:19
  3. WSF Caproni Ca.3
    By Wombat in forum Shapeways Models
    Replies: 9
    Last Post: 06-07-2012, 03:42
  4. Caproni C3
    By Belis4rius in forum WGF: General Discussions
    Replies: 10
    Last Post: 10-14-2011, 16:09
  5. Caproni C 3
    By Raffvantye in forum Hobby Room
    Replies: 2
    Last Post: 08-11-2011, 05:59

Tags for this Thread

Bookmarks

Posting Permissions

  • You may not post new threads
  • You may not post replies
  • You may not post attachments
  • You may not edit your posts
  •