Ares Games
Results 1 to 17 of 17

Thread: OTT FYM Mission 1 - First Outing - 5th April 1917 - by Hu Rhu

  1. #1

    Default OTT FYM Mission 1 - First Outing - 5th April 1917 - by Hu Rhu

    OTT-FYM Mission 1: First Outing – 5th April 1917 by Hu Rhu

    The weather started off misty and cloudy but it had improved enough to bring forth aircraft from both sides to do battle as the build-up towards the Arras offensive got into its stride. Every headquarters needed photos of all sorts of things, so the observation squadrons were ordered up. With the Germans having retreated to their new lines and the impending offensive against those new enemy positions - and the only maps came from photos - photo ops needed to be flown. It was also the day which saw the first operational sorties flown by the new Bristol Fighters, the BF2a.

    Click image for larger version. 

Name:	F2B.jpg 
Views:	124 
Size:	69.1 KB 
ID:	335244

    The first flight consisted of 6 aircraft commanded by none other than Captain WL Robinson, who had won the Victoria Cross for shooting down the German Schutte Lanz airship SL11 over north London in Sep 1916.

    Click image for larger version. 

Name:	Robinson.jpg 
Views:	124 
Size:	28.9 KB 
ID:	335245

    Great things had been forecast for this new aircraft, however, at this stage of its development, it had been decided by Capt Robinson that, if attacked, the Bristols would merely close up and let the combined fire from the rear gunners force away the would-be attackers. (For an understanding of how well this tactic worked see the bottom section of the briefing – Historical Outcome).

    Scenario

    This scenario will attempt to re-create the conditions of that first combat, with the RFC aircraft using the correct doctrine of flying in close formation.

    Mat Set Up

    A No Man’s Land (NML) mat and a countryside mat (or any other type) that will be enemy territory; these are joined on the long sides with the trench map being on the western (left) side and countryside mat being on the Eastern (right) side.

    Click image for larger version. 

Name:	Mat.jpg 
Views:	123 
Size:	137.5 KB 
ID:	335246

    Aircraft Starting Positions

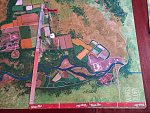
    Having spotted the enemy, the three Bristol fighters are set up in close formation in the centre of the two mats, with the lead aircraft just over the centre line and the other two aircraft in echelon to the left and right rear as shown on the photo.

    If you don’t have three Bristol fighters, you can substitute either RE8, DH4 or Sopwith 1 ½ strutters, however the three aircraft must fly the same manoeuvre deck. The two seaters are to be armed with a single Vickers firing forward and a single Lewis gun to the reaer.

    Click image for larger version. 

Name:	Bulldogs.jpg 
Views:	123 
Size:	135.2 KB 
ID:	335247

    Three Albatros D.III approach with two planes to the southeast and one to the northeast of the Bristols. The northern aircraft is placed two rulers from the eastern edge and one ruler in from the northern edge. The other two aircraft are placed two rulers in from the eastern edge and one and one and a half rulers respectively, from the southern edge as per the photos.

    Click image for larger version. 

Name:	Eagles Set Up 1.jpg 
Views:	125 
Size:	121.7 KB 
ID:	335248 Click image for larger version. 

Name:	Eagles Set Up 2.jpg 
Views:	124 
Size:	121.2 KB 
ID:	335249 Click image for larger version. 

Name:	Eagles Set Up 3.jpg 
Views:	122 
Size:	114.0 KB 
ID:	335250

    Aircraft Restrictions

    In line with the doctrine of the day, remove the Immelmann turn card from the S Deck (or equivalent).

    Initially the Bristols will fly attempt to fly in close formation. To achieve this, select manoeuvre cards for the lead aircraft only, and apply to all three aircraft. Ideally select a manoeuvre that will place the attackers in the rear arc. This will reflect the attempt to fly in close formation using firepower to ward off the attackers. Only adjust cards for individual planes to prevent collisions when flying in close formation. (i.e. be the I in AI)

    Only when the first Bristol is shot down or FRTB will the RFC aircraft then revert to being flown individually. Select cards for each remaining aircraft individually from the start of the next full turn.

    There are no manoeuvre restrictions on the German aircraft.

    Mission

    Shoot down or force the enemy aircraft to return to base.

    Victory Points
    For each aircraft shot down – 10 points
    For each aircraft FRTB – 5 Points


    Historical Outcome

    On the morning of 5th April six Bristol F2a of 48 Sqn led by Capt Robinson, took off from Bellevue at around 1000 hrs for an offensive patrol to Douai. Their base was over 40km to the front at Arras and by the time they had gained height, crossed the lines and were well east of Douai, it was nearing 1100 hrs. Having been reported by German ground observers, a telephone to Jasta 11’s base at Brayelles had von Richhtofen’s pilots taking off within minutes, led by the Baron himself.

    Having spotted the Albatros scouts, the Bristol pilots closed up while the gunners waited for the range to decrease. Down came the five machines from Jasta 11, machine guns blazing. First one then another Bristol was hit, dropping out of formation. Von Richthofen singled out one flown by 2Lts Leckler and George which he engaged, finally forcing it down near Lewarde, south-east of Douai.

    Having shot down one aircraft he then set off after the other four aircraft, Ltn Festner having already knocked down Robinson’s machine. He caught up with them over Douai and brought down Adams and Stewart near Cuincy, just west of Doaui. Ltn Georg Simon claimed the fourth, downed north of Monchecourt. The other two scraped over the lines, full of holes. They claimed two of their attackers shot down but Jasta 11 suffered no casualties.

    The total tally was:

    A3337 Capt WL Robinson VC POW 2Lt ED Warburton POW

    A3320 Lt HA Cooper POW/WIA 2Lt A Boldison POW/WIA

    A3343 Lt AT Adams POW/WIA Lt DJ Stewart POW/WIA

    A3340 2lt AN Leckler POW/WIA 2Lt HDK George KIA

  2. #2

    Default

    Nice one Gary. Good to see the introduction of the Bristol Fighter. Hope they fare better than the historical first engagement!

  3. #3

    Default

    Thanks, Gary, I take it that the flying doctrine of no Immel still applies even after one of the formation falls out ?

    Some of the Bulldogs may require more crew, just ID them in the AAR and Uncle will add them to the roster come Tally time !
    Last edited by flash; 01-31-2024 at 08:12.

    Sapiens qui vigilat... "He is wise who watches"

  4. #4

    Default

    Very timely. It just so happens I'm in the midst of constructing 4 Valom planes - 2 Rumplers and 2 Bristol F2Bs. One Rumpler is ahead of the other three due to the...er, ahem,...challenges of having to put in 8 of the wing struts per plane. I hope I can get these done in the next two weeks so that the F2Bs can be used in this scenario - as F2As, of course.

    Quote Originally Posted by flash View Post
    Thanks, Gary, I take it that the flying doctrine of no Immel still applies even after one of the formation falls out ?

    Some of the Bulldogs may require more crew, just ID them in the AAR and Uncle will add them to the roster come Tally time !
    Yes, my tandem bunch are pretty much shot up. I will need to add a couple of recruits as observers. PM sent for a couple of editorial changes on my FYM roster for tandem crew being out longer than shown.
    Last edited by ShadowDragon; 01-31-2024 at 12:03.

  5. #5

    Default

    I never really understood why this went so badly for the Bristols. My understanding is that close formation flying and beating off the enemy with concerted firepower was our standard practice for tandem formations.

    Maybe I'm wrong about that but if not, why is this particular mission quoted so often as being an example of poor tactics and that Robinson seems somehow to be at fault and takes the blame.

    I know that the Bristol was originally intended as a replacement for the Be2 but with the Rolls Royce engine it had more the performance of a scout and that's how it was so successful and better employed. But if Strutters and RE8's were flying in close formation and not dying in droves why is there this inference that Robinson was doing something out of order?

    Is it because close formation flying always failed or is it because, with hindsight the Bristol flew better as a fighter so that this became seen as a mistake when in fact it was normal practice at the time.

    Either way I'm looking forward to flying the Bristol, I flew one, in I think my 2nd ever game and it was loads of fun. I don't believe it's flown since, so might be slow until I've blow off the cobwebs.

  6. #6

    Default

    I agree with John. Never could understand the outcome of this event. Perhaps solely down to the superior tactics and flying of Richthofen and co?
    Given that some of the players might decide to fly without the use of altitude rules, what is the take on the firing arc of the rear gunner of the Bristol at the same altitude as the attacker? Do we play blind spot rule at close range or not? I seem to recall reading, quite recently, that we should not be playing it for this aircraft. And if playing altitude, does the blind spot only apply where the attacker is below?

    Nice mission either way - I'm looking forward to playing it Thanks Gary!

  7. #7

    Default

    OK, so I think I found the answer to my own question. Quote from Dave follows, as taken from Andrea's as yet unpublished supplement to the rules -
    360 Arcs of Fire for Rear Gunners:
    Q: Other than the Roland do other two seater rear gunners have the 360 arc of fire at higher targets?
    A: Andrea:- This is the rule I wrote in the next, still unpublished official supplement:
    Roland C.II/C.IIa, Bristol F2B Fighter, Halberstadt CL.II, Hannover CL.IIIa - altitude and arc's of fire.
    This rule can be used if the altitude rules are also in use. These planes have higher rear machine guns that can be turned 360°: use the arc of fire on the card/base with the blind spot for targets at the same or lower altitude but their rear machine guns can ignore both the blind spot and the firing arc when firing at targets at higher altitude..."
    It should be noted that these machines rear guns also have a wider arc at targets on the same level similar to that of the Roland C.II ie anywhere but their machines front firing arc.
    http://www.wingsofwar.org/forums/sho...ard-base-error
    Hope this is correct and that we are using it

    I do not want to upset anybody, and I am anxious that everyone is playing on a level playing field, so to speak, but as I read this, the Bristol has a rear gun firing arc that extaends everywhere but the front gun arc, when the target is at the same altitude. Also, that it has a 360 degree firing arc at targets higher than its own altitude. Normal blind spot applies when target is at the same level or below only.
    Is this correct and is it the way everyone will play this scenario?
    Last edited by mikeemagnus; 02-01-2024 at 09:36.

  8. #8

    Default

    Another question please, Gary You have quoted the Bristol F2A in the mission. Is this deliberate? Or can we fly the F2B? I'm not sure it makes a lot of difference except marginally to the speed, but I thought I would ask, just in case.

  9. #9

    Default

    Quote Originally Posted by mikeemagnus View Post
    I do not want to upset anybody, and I am anxious that everyone is playing on a level playing field, so to speak, but as I read this, the Bristol has a rear gun firing arc that extends everywhere but the front gun arc, when the target is at the same altitude. Also, that it has a 360 degree firing arc at targets higher than its own altitude. Normal blind spot applies when target is at the same level or below only. Is this correct and is it the way everyone will play this scenario?
    This is correct, Mike, it's up to the players whether they take advantage of this - though they may choose to play it as per the card as it's the early days of the type.

    Quote Originally Posted by mikeemagnus View Post
    Another question please, Gary You have quoted the Bristol F2A in the mission. Is this deliberate? Or can we fly the F2B? I'm not sure it makes a lot of difference except marginally to the speed, but I thought I would ask, just in case.
    It's deliberate as historically that was the machine used in the event on the day. The B was 16kph faster than the A but both fall into the fast speed bracket of WoG so makes no difference in game terms. I'd use B/B armed machines though.

    Sapiens qui vigilat... "He is wise who watches"

  10. #10

    Default

    Re the use of the early Bristols -
    I'd use B/B armed machines though.
    Yep. Already made that decision

    Thanks for the heads up on the firing arc. I was aware of the speed difference, but not of any difference to the firing arcs. They were the same were they not? If not, do you know when and why the change was made and when the F2B first appeared at the front?

  11. #11

    Default

    Quote Originally Posted by mikeemagnus View Post
    ..Thanks for the heads up on the firing arc. I was aware of the speed difference, but not of any difference to the firing arcs. They were the same were they not? If not, do you know when and why the change was made and when the F2B first appeared at the front?
    The first operational F2A were delivered to 48 Sqn in dec '16, the game we're playing is their first offensive patrol, so they may not have realised how good their arcs were or how best to use them. The F2B's combat debut was May 2nd by which time they'd learnt how to use them to their advantage.

    Quote Originally Posted by Vagabond View Post
    I never really understood why this went so badly for the Bristols. My understanding is that close formation flying and beating off the enemy with concerted firepower was our standard practice for tandem formations. Maybe I'm wrong about that but if not, why is this particular mission quoted so often as being an example of poor tactics and that Robinson seems somehow to be at fault and takes the blame...
    He got the blame because he thought he knew better - not appreciating the machine could be used offensively without covering each other, he stuck to the standard tactics, didn't listen to advice not to fly at 4000' & told the armourer not to oil the guns as he'd heard there was an issue of it freezing at higher altitudes - they consequently seized. Seems he was not up to the task on the Western Front.

    Sapiens qui vigilat... "He is wise who watches"

  12. #12

    Default

    Hi Guys,

    Sorry for all the confusion and controversy this scenario has caused. The scenario was not designed to castigate Robinson or the British but chosen because the start of our FYM campaign was designated as 5 Apr 1917, the exact date that this action took place. Call it serendipity, but it was too good an opportunity to miss. Here are some clarifications.

    Firstly scenario confirmations:

    The Immelman turn is not avaialble to the Entente pilots at any stage in the game.
    Secondly they have only single guns in front and rear.
    Lastly I was not aware of the issue about no blind spot, so those flying the mission can choose to play it at close range or not. I have flown this mission with a blind spot and believe that it might have evened up the scores but would probably not have changed the overall outcome.

    Secondly the tactics. These were standard tactics for the day and while they might have been successful up to now, the situation had changed with the introduction of the twin gun armed Albatros, using better tactics (Dicta Boelcke) and organisation (Jagdstaffel) and led by competent leaders such as Richtofen. The winter months had seen quite a reduction in sortie rates from both sides which allowed the Germans to improve their equipment and training and now this starting to pay off.

    April 1917 was the 'perfect storm' for the RFC as all these factors came together and produced Bloody April, where 245 aircraft were destroyed as a direct result of air actions with 316 RFC pilots either killed or missing. Compare this to the losses for the period of the Somme Offensive 1 Jul to 22 Nov, a period of four and a half months when 499 pilots and oveservers were lost at an average rate of 110 per month*.

    By the way the British continued to use these tactics well into May 1917, by which time better machines and (for those who survived Bloody April) better tactics started to emerge and by Jul 1917 and well into 1918, the RFC held the edge. As to how the Bristol Fighter could have been better used - Hindsight is a wonderful thing!

    It is up to you, within the constraints of the scenario, to see if you can do better than Robinson and his compatriots. I wish you luck. I'll be posting my attempt in the next 24 hours.

    * Reference : Bloody April 1917 - Franks, Guest and Bailey - Grub Street - 2017
    Last edited by Hu Rhu; 02-03-2024 at 03:16.

  13. #13

    Default

    Quote Originally Posted by Hu Rhu View Post
    Hi Guys,

    Sorry for all the confusion and controversy this scenario has caused. The scenario was not designed to castigate Robinson or the British but chosen because the start of our FYM campaign was designated as 5 Apr 1917, the exact date that this action took place. Call it serendipity, but it was too good an opportunity to miss. Here are some clarifications.

    Secondly the tactics. These were standard tactics for the day and while they might have been successful up to now, the situation had changed with the introduction of the twin gun armed Albatros, using better tactics (Dicta Boelcke) and organisation (Jagdstaffel) and led by competent leaders such as Richtofen. The winter months had seen quite a reduction in sortie rates from both sides which allowed the Germans to improve their equipment and training and now this starting to pay off.

    April 1917 was the 'perfect storm' for the RFC as all these factors came together and produced Bloody April, where 245 aircraft were destroyed as a direct result of air actions with 316 RFC pilots either killed or missing. Compare this to the losses for the period of the Somme Offensive 1 Jul to 22 Nov, a period of four and a half months when 499 pilots and oveservers were lost at an average rate of 110 per month*.

    By the way the British continued to use these tactics well into May 1917, by which time better machines and (for those who survived Bloody April) better tactics started to emerge and by Jul 1917 and well into 1918, the RFC held the edge. As to how the Bristol Fighter could have been better used - Hindsight is a wonderful thing!
    Thanks for this Gary, I wasn't inferring you were castigating Robinson, if that's the way it came over my apologies.

    I'm not particularly well read on WW1 warfare but everything I've come across, which probably isn't a lot in the scheme of things, says something similar about the fight. It's always seemed to me that if you have a relative set of new aircrew and a new plane type you would do what had been done before by other tandems. The fact that it could have been done better is wonderful in hindsight as you say. I'm assuming the aircrew were new to the front in this plane, I haven't checked that, but then for them to meet Jasta 11 was pretty bad luck.

    I'm just off to read your report now, hoping it went better for the Entente than it was historically.

  14. #14

    Default

    Malheuresement I only have 2 Bristols so can I fly with 3 x 1 1/2 Stringers instead .?


    I'm learning to fly, but I ain't got wings
    Coming down is the hardest thing

  15. #15

    Default

    Quote Originally Posted by tikkifriend View Post
    Malheuresement I only have 2 Bristols so can I fly with 3 x 1 1/2 Stringers instead .?
    Absolutely you can - just apply the same tactics. In fact the speed of the F2a version (the one in the scenario) might be better suited with a V Deck anyway. Just up the damage points to 16 to match the airframe.

  16. #16

    Default

    Played this with the J*/V deck as per directions & it worked well enough but the F.2A's wiped the floor with the Hun in short order, which was not the intent. As I'd used the alternate jam rule I decided to re-play it with a couple of tweaks, I started the lead Bristol back with his nose on the mid line, tightened the formation, added a second Albatros to the north & slightly adjusted the alt jam for the Bristols. The game lasted much longer and had survivors on both sides but a very definite win for the Hun. I will post it in the next day or two, but if you have a fourth eagle to add to the mix it may make all the difference.
    Thanks for the two good games I got from this scenario, Gary.

    Sapiens qui vigilat... "He is wise who watches"

  17. #17

    Default

    Quote Originally Posted by Hu Rhu View Post
    Absolutely you can - just apply the same tactics. In fact the speed of the F2a version (the one in the scenario) might be better suited with a V Deck anyway. Just up the damage points to 16 to match the airframe.
    Wilco


    I'm learning to fly, but I ain't got wings
    Coming down is the hardest thing


Similar Missions

  1. AAR OTT ED Mission 16 - Prelude to Arras - April 8th 1917
    By Lt. S.Kafloc in forum Over the Trenches
    Replies: 25
    Last Post: 11-03-2015, 08:15
  2. BRF OTT ED Mission 16-Prelude to Arras-April 8th 1917
    By johnbiggles in forum Over the Trenches
    Replies: 44
    Last Post: 10-14-2015, 03:37
  3. AAR OTT ED Mission 16 - Prelude to Arras - April 8th 1917
    By Teaticket in forum Over the Trenches
    Replies: 13
    Last Post: 09-30-2015, 11:55
  4. AAR OTT ED Mission 16----Prelude to Arras, April 1917----gully_raker
    By gully_raker in forum Over the Trenches
    Replies: 27
    Last Post: 09-28-2015, 21:49
  5. AAR OTT ED Mission 16 - Flashes Prelude to Arras - April 8th 1917
    By flash in forum Over the Trenches
    Replies: 14
    Last Post: 09-28-2015, 21:41

Bookmarks

Posting Permissions

  • You may not post new threads
  • You may not post replies
  • You may not post attachments
  • You may not edit your posts
  •