
-
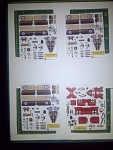
 Zio Prudenzio Model Cards - My 1st Project
Guys,
I'm too cheap to buy die-cast at the Out-of-Production prices. It must be my Scottish heritage. But, as I've done lots of small models in the past, I thought I could handle some paper models. The planes I've seen in this forum made it look easy (this is a compliment, for those posting their work). And the Close-ups and Web browser image zoom features make the job look way easier than I anticipated.
So, I'm still on the extended business trip. I've gone through two large cities, and a couple of small towns, and any of the gaming/hobby stores I found are sold out of, or charging lots of money for (slim pickings of), minis. This forum inspired me to put my modeling experience to work, save me some money, and give me something to do with my hands and mind rather than all business. I thought I could pick up a few small (portable) tools and get my local business supply store to help out. There was a few things there, but not necessarily the right stuff. Directly across the street from the hotel was a hobby store! So, I picked up some of the tools there, and a cutting mat (8X11), with the rest from the business store (UHU glue, titanium scissors, and printing). When I get home, if this project doesn't drive me crazier than I already am, I'll set up a workshop and assembly line. I'm also looking at using Photoshop to do historical Canadian pilot craft (IE: 10 RNAS Sqn, "B" Flight Sopwith Tri-planes).
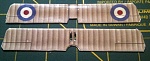
Getting the scale right from the drawings was a bit touchy, and I'm sure I'm off. But 2.3 inches for the wing span on a camel was what the math said, and the desktop publishing software didn't do a mix of imperial and digital measurements. So, I got as close as possible (MS Publisher indicated 14% image size for the one camel). Then, I took some suggestions, and printed four images. This was printed on 32lb semi-gloss paper, from someone's suggestion of the right rigidity but workable. Not two of two, cause I thought I could do this fairly well with my previous experience (wait for it...).
(Pictures are with my phone, sorry)
Back at the Hotel, I cut out the plans for my "flight" of camels. Really, I thought I could get all of these planes out of this project, and one of each was to build up that flight. I was "hedging my bet", and pretending to follow the advice of people with experience from the forum, thinking I'd "practice" on a few camels before I got to Camel A and the Fokker DRI (Practice for the Sopwith Tri-planes). Oh, and through some other posts, either here or at Fiddler's Green, I figured I should acquire some other material. Re-enforcing material for some parts. 60lb and 100lb card stock (wing and body filler), and a McDonald's cardboard burger container (wheel filler and other places as needed. It is about the thickness of three to four 100lb card stock sheets. And it's "free", if it isn't covered in condiments and grease.). I've started looking at any paper, card stock, or cardboard packaging as possible building material. I started with Camel C...

This is where reality hit. OMG - these pieces are small! And they are the big ones! My eyes are not going to be able to work on this unaided. And my fingers are too big! Now I know why I am having difficulty finding 1/144th scale plastic models of biplanes. The bits would be melted by the glue.
OK. So, I really am gonna practice on the first two planes, and if I get anything usable out of them, it will most likely be skills, not good looking planes. And it will take a magnifying glass or goggles to do this with anything near precision.
Perhaps by next weekend I will have something further to add, but it might be a photo of crumpled paper. I'm now hunting for vision assistance equipment.
'Til next time.
Old Guy 59 (with eyes alot old than I thought)
Last edited by OldGuy59; 08-10-2012 at 16:11.
Reason: spelling
-
Heh! I know what you mean about "old eyes" and tiny pieces. I use the most powerfiul reading glasses I can find when working on these models. For some really good tips on handling these pieces I would recommend Getter's "how to" article at http://www.wingsofwar.org/forums/sho...ghlight=Getter
The man is an artist and his models look great when done.
Pat
-
Try building one of the camels at 1/72 scale (full page) just to get a feel for working with paper.
Admittedly, building at 1/144 scale is intimidating.
If I had not been building paper models for the last ten years, I never would have tried building at 1/144 scale.
A few years ago, I tried to build a German Me 110 at 1/144 scale and gave up on it because I thought that I could not do it.
Now, with the experience of building WW I fighters at 1/144 scale, I am tempted to try the Me 110 again.
-
Good luck with this project and I'm looking forward to seeing how they turn out! I've given it a try a couple of times and never had the determination to finish a project  With my vast lack of time at home for hobby stuff and a ready supply of spare official minis, I just can't seem to make my self truly give this a go. I do have a few that other have made and they can turn out beyond amazing though!
-
Thanks guys for the notes. Pat, the thread was one I've seen before, but forgot where. I will use it a lot.
The 144th thing is mostly my eyes. I did a lot of freehand carving of metal and plastic for customizing 25mm figures (WH40K), so this shouldn't be too hard (if I can see the parts). However, handling paper is gonna be a new skill, no matter what the scale. I haven't figured out how I'm getting these things home, if I do manage to build something decent. So, I'm gonna waste paper, I suspect. If I am lucky, I will have something to stuff in my baggage.
-
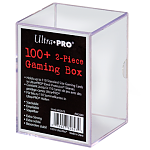
Mike, if they turn out nice, look for one of these at any comic/sporting card store. They take up little room and would protect your planes nicely.
-
I certainly understand the thing with the eyes. I'm barely middle aged, never had much problems with sight, but these little plane are giving me all sorts of trouble. I've bought a couple of fairly strong reading glasses, but I think I'm going to have to upgrade even those.
/Niclas
-
Part Two
I found a 2X desk magnifier that will travel well (I hope), and wasn't too expensive. This first card airplane is now up to $60.00 (parts and equipment). If I get all the planes I printed, that will drop to $15 each. Every plane thereafter gets cheaper (and better, I hope).
I have been following some suggestions, but I'm trying to adapt some of my previous modeling skill to the effort. I tried using the McDonald's cardboard for the wings and body, mostly for structural strength that I'm not getting with the 32 lb paper I used (others have suggested 64 lb, I thought 32 would be easier to work with), but also for the shape. You can tell me I'm gonna regret this, but I like the effect on the wings (So far. We'll see if it actually goes together). I made a mess of the fuselage join, partly because of my eyes, and not getting the size of the cardboard join piece right. Next time...
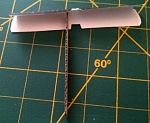
This is using the McDonald's burger box cardboard for rigidity and strength. It was also to make gluing easier on this long tiny edge. I need more practice.
Note the UHU Glue black marks from the clamp tweezers. There was a warning about this in one of the Card Plane threads. Now that I've read it, I'll keep this in mind. I found out that I had estimated wrong, after I tried to glue this together, but the UHU glue let me separate the join without wrecking the material. Another try, but it was still wrong. It will get fixed on the next model.
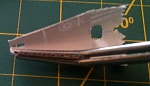
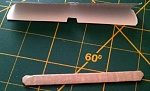
This next picture is the edge-on view of the McDonald's cardboard.
Then, I trimmed it to fit in the wing, but not to the edges. When I glue the edges, I don't want the cardboard to show.
Glued in place. The package colouring was brown on this piece, so I glued the unpainted side down.
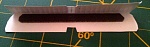
Another view, showing the thickness.
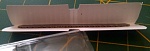
The wings trailing edge glued and formed. I pressed the wings together with my fingertips, pressing on the underside of the wing. This made the lower piece of paper conform into the space created by the cardboard. This created an "aerodynamic chord", and shaped the wing to, what I believe should be, the shape of a wing.
This last picture shows (very poorly, I'm sorry, my phone is not a good detail camera) the chord of the wing (before edge gluing the tips).

So, now I have two wings with some structural strength, and what I hope is a realistic looking wing. It remains to be seen if this will actually fit together.
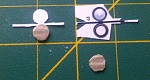
I have yet to tackle the really tough parts, and I'm thinking that the cardboard will really work well as wheel filler. If I can get the holes for the axle cut, then the wheels will be really solid.
'Til next time...
Old Guy 59 (yup, eyes alot old than I thought, fingers shake pretty bad, too!)
Last edited by OldGuy59; 08-10-2012 at 16:12.
Reason: spelling
-
 Looks fine so far Mike.
I will be interested to see your final result.
Rob.
-
Looking good Mike - Love the airfoil effect on the wing!
/Niclas
-
Mike,
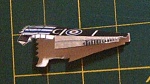
Your camel with the blue stripes on the nose is starting to come together very nicely.
Glue is a personal preference.
I use UHU for plastic prop disks and thin struts.
For edge gluing, I use Aleene's original Tacky Glue.
For gluing flat surfaces together, I use Elmer's White Glue.
Try various glues and see which ones work the best for you.
Ken
-
Part Three
Sorry this took so long, but the business part of the trip required more of my evenings than planned. But I'm now home! For a little while.
Oberst Hajj, thanks for the sugestion, and I found a card box in the little town I was in. It was actually given to me by a customer in the little gaming store I visited, as they didn't have any to sell. I was showing them my phone pictures to give them an idea of what I needed the box for. The customer was so blown away, he took his collector cards out of his box and handed the box to me.
So, in my rush to complete my plane, I was messing it up. The UHU glue saved me again.
I put a former in the fuselage, under the gun hump, to help with the shape, and give me something to press the joint together with. I didn't know exactly how big to make this, but I gave it a try. This will come back to haunt me...
I did the wheels with the cardboard filler. This will need some practice, as I think the cardboard was too big. The glue tab didn't get covered. I decided to leave it for this plane.
I managed to trim out the engine parts, but the little rods in front of the cylinders was a real pain. Then the cowling wouldn't go together.
The former was misshaping the fuselage (Along with a previous piece of cardboard I used to join the bottom of the fuselage). So I had to cut the former out, and completely reshape it. The new former had to take into account the join cardboard, too (just visible at the bottom of the fuselage, in the fuselage picture above. This cardboard piece flattened out the bottom, and squared off the outside of the fuselage. The cowling would NOT fit!). As a precaution, and to give me something to press against for the front of the fuselage (and the upper fuselage join), I put in a "Firewall" round-piece of cardboard, just back of the edge of the fuselage, where the cowling went on. No picture of this, but the engine and cowling now fit!

Last thing I managed to accomplish before I started home was the landing gear! What fun! The little piece of paper that was the axle was not something I wanted to use. And using reference pictures on-line showed an airfoil type piece, not a rod. I tried a toothpick, but it was too big around. But wood carves! So, I tried to shape the wood into a bit of an airfoil, or at least cut down on the thickness. It sort-of worked. Need more time to practice, and maybe shaping the piece before cutting it to length would give me more to hang onto.
I am trying to figure out how to get the top wing on, without messing this up to bad. Suggestions are solicited.
'Til next time...
Old Guy 59.
Last edited by OldGuy59; 08-05-2012 at 18:02.
Reason: extra pictures removed
-
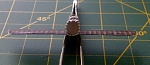
One comment on the landing gear axle. The one they give you is too wide. I had to cut mine down by about a third to make it look right. More in accordance with this diagram
Like you I had, for the first couple of models, used the size axle given on the sheet. But it didn't look right next to the Nexus camel models. So I checked out some diagrams and saw that it needed to be made much narrower.
Pat
-
The aircraft is really coming along well Pat.
I like the way that you have put the wings together.
People often don't appreciate how much stronger you can make a structure by forming a curve. Not only does it look better, but it adds that extra rigidity that paper models need.
Rob.
-
I'm glad you were able to find a box and that it worked for you. Your plane has made it a lot further then anything one I've started before! Keep up the good work and I'm sure you will get the hang of it.
-
Part Four
Pat, thanks for the diagrams. I cut the axle off, redid the length and shape, and glued it back on. I also redid the tail a bit to level out the elevator.
Then, I tried to attach the upper wing. My vocabulary was not suitable for polite company, and I had lots of problems getting this right. As noted in another thread, the outer struts are too long, and there is no dihedral in the lower wing. I'm not cutting it off to fix it. I'll try and adjust it on the next two tries.
[Edit: Point to note - don't glue the entire strut fold! After the glue dries, the strongest part of the paper is the glue. So trying to flare the ends so you can glue them to the wings was nearly impossible. Only glue the colored strut portion. For this plane, on the fuselage, I cut slots into the fuselage and inserted the (glued) ends of the struts, rather than flare the ends and glue them to the outside. I thought this would add structural strength, and keep the strut ends exactly where I wanted them. I forgot about the cardboard formers in the nose, and the firewall one right behind the engine made cutting the slots a bit difficult. Getting the struts into those same holes was only possible by using an X-acto blade as a shoehorn!]
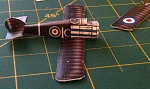
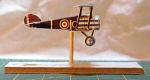
I found a Base Card sheet (Link), and printed it out for my group of planes (it had two Camels and a few Fokker DR1s). I tried to find a few more boxes, for the next builds, but got the wrong size. However, the store owner gave me a stack of card plugs, that I could use for bases (until I spring for the clear ones). So, the "completed" Camel is almost ready for playing. I need a few more planes to actually get a game going, though. This plane still needs its guns, and I'm going to get a sheet of plastic spinning propellers, for that "flying" look. Before they get added, I'm thinking of clear-coating the plane, and attacking it with acrylic paints or inks.
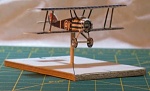
Considering how much of a pain this was to put together, and the lack of reference points (IE: the center top wing supports were not marked on the wing, like the outer strut points were), this looks a lot better than I expected for my first try. It didn't end up as a wad of crumpled paper, even if the top wing got me awful close today.
'Til next time... (My 2nd Project - Kempf's Fokker DR1)
Old Guy 59
Last edited by OldGuy59; 02-17-2013 at 00:13.
Reason: Links to new project
-
Mike,
Congratulations !
You are now one of the Paper Model Masters.
1/144 scale is intimidating but now that you have done one, you know that it can be done.
They look as good, if not better, than the commercial models and cost only time instead of money.
Ken
-
-
Pat, I know what tou mean about attaching the upper wing. NONE of the EIGHT frikking struts seems to be the right length! Add in trying to get them at the right angles and its a nightmare. Congratulations on getting it to look so nice!
Pat Stapleton
-
Very good work, especially for first attempts. My first attempts (and they were twice the size at 1/72 scale) were not anywhere near as good. Keep it up!
Doug
-
Almost There!
Final Touches,
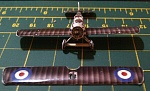
OK, I finally got to the Business Supply store and had some more copies made. I now have enough paper planes to keep me busy for months (years?!). These are all done on 65 lb paper, so we'll see how that goes. While I did that, I had some Prop Disks copied onto a transparency. This should provide me with prop disks for all the other planes, and more.
Also, my better half found some coloured Staedtler Triplus fine point markers. So, I tried trimming out the camel with them. The colours were great for the upper wings, tires and the rudder blue and red. So, still without guns, this is the camel:

I have cut out the other two A and B flight camels (32 lb), and Richtofen's (32 lb) and Kemft's (65 lb) Fokker DR 1's.
The next pictures will probably need to go on a new thread, so there may not be any updates on this one, besides a link to the pictures of the new planes. (Kempf's Fokker DR1)
Thanks for following this, and all the great suggestions and encouragement.
Signing off,
OldGuy 59 (Mike)
Last edited by OldGuy59; 09-02-2012 at 15:44.
-
Mike the camel turned out great. I look foward to your next thread. Keep up the great work. 
-
Great report with pics and explanations!
This is a good looking finished plane! Your 1st effort is really impressive and inspiring.
Alkis
-
Great, great job. And thumbs up for Zioprudenzio who did really fìgreat jobs! He once event sent me a S.79 with the colors and codes of the main character of a gamebook of mine. Very skilled and kind person!
 Posting Permissions
- You may not post new threads
- You may not post replies
- You may not post attachments
- You may not edit your posts
-
Forum Rules


 Reply With Quote


 Eh?!
Eh?! 


Bookmarks