Ares Games
Results 1 to 25 of 25

Thread: Jasta 40: The Black Fokker Boys Pt 1

  1. #1

    Default Jasta 40: The Black Fokker Boys Pt 1

    So when Zoe Brain asked the Australian Wing who would like to place a shared order, I thought "Why not?" I like Fokker Dvii's so what would be better than one of those? Well at least several would be better than one, wouldn't they? So I got several. Ok, eight. Eight of the Shapeways model Dvii...

    So after soaking them in soapy water overnight, then soaking them in water during the next day, then leaving them to dry out overnight again, I was ready to start. So after 3 coats of PVA wood glue I was ready to start. After 2 coats of white undercoat I was REALLY ready to start! So I started.

    I painted all the bits first and cut pilots to size to fit the cockpits (a tight squeeze but they finally obliged me - and my cutters). The pilots were the tedious bits really - painting & shadowing the features of their little faces, painting the goggles & the strap that holds the goggles...

    Then I just stuck on the decals that Zoe Brain had very kindly designed and printed for me. I think they are excellent and I hope that you agree with me. The final bits were paint touch ups for gaps between decals etc. The aircraft were then super-glued together using the Shapeways instruction sheet.

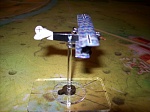
    So I hereby present the first 3 of my new Jasta 40 Fokker Dvii aircraft, the white heart of Willy Rosenstein, Frodien's white hawk's head and Anton Raab's one-eyed cat...yes, I super-detailed the decal...

    I really enjoyed painting and constructing these planes and there were only a few breath-taking moments - mainly while weilding the super-glue. Thanks again to Zoe for the decals. More of the Black Fokker Boys will be posted shortly!

    There are more pictures in the album on my profile page along with drawings of the original machines.

    http://www.wingsofwar.org/forums/album.php?albumid=1479

    I just added the Shapeways Fokker Dvii exploded plan in case anyone was interested in building one of these little beauties. I chose the kit version of course so that I could get into the normally difficult places easily with decals. I will be more than happy to acquire more of these little kits in the future.

    Click image for larger version. 

Name:	shapeways Fokker Dvii     3a.jpg 
Views:	171 
Size:	145.5 KB 
ID:	49381Click image for larger version. 

Name:	shapeways Fokker Dvii     4.jpg 
Views:	156 
Size:	224.5 KB 
ID:	49382Click image for larger version. 

Name:	shapeways Fokker Dvii    8.jpg 
Views:	137 
Size:	126.1 KB 
ID:	49383Click image for larger version. 

Name:	shapeways Fokker Dvii   15.jpg 
Views:	136 
Size:	207.8 KB 
ID:	49384Click image for larger version. 

Name:	shapeways Fokker Dvii   14.jpg 
Views:	142 
Size:	153.2 KB 
ID:	49385Click image for larger version. 

Name:	shapeways Fokker Dvii   13.jpg 
Views:	178 
Size:	148.9 KB 
ID:	49386Click image for larger version. 

Name:	shapeways Fokker Dvii   9.jpg 
Views:	133 
Size:	135.2 KB 
ID:	49387Click image for larger version. 

Name:	shapeways Fokker Dvii   11.jpg 
Views:	135 
Size:	155.9 KB 
ID:	49388
    Attached Thumbnails Attached Thumbnails shapeways fokker d7 plan.jpg  
    Last edited by Dark Horse; 06-14-2012 at 03:54. Reason: added shapeways Fokker Dvii plan.

  2. #2

    Default

    Thats a great looking Kette! Interesting to see how the Shapeways "buildable" version comes together.

  3. #3

    Default

    Looks Great!

    James

  4. #4

  5. #5

  6. #6

  7. #7

    Default

    Those have got to be some of the best set of Shapeways planes that I have seen, not only for finish but also for decaling.
    I know because my Black Fokkers were Nexus and they did not come out any better than that.
    Well done for the work, and well done Zoe for producing the decals.
    Rob.

  8. #8

    Default

    Those are so good, how did you find assembly once you had put the lozenge decals on?
    I found it difficult to find the correct positions for the struts.
    You certainly don't look as though you had the same issue, cracking stuff Nigel

  9. #9

    Default

    those look really nice.. need to build my last two DVIIs from Shapeways..

  10. #10

    Default

    Quote Originally Posted by Boney10 View Post
    Those are so good, how did you find assembly once you had put the lozenge decals on?
    I found it difficult to find the correct positions for the struts.
    You certainly don't look as though you had the same issue, cracking stuff Nigel
    I usually hold mine up to the light and you can see through, but I guess with Shapeways you have to feel for the slots. I will be interested to hear how you did it too.
    Rob.

  11. #11

    Default

    Well done, they look lovely

  12. #12

    Thumbs up

    Just supurb work Nigel. Wonderful detail on the pilots.
    Are you planning to do Carl Degalow's "Golden Stag"?
    I have his biography by Peter Killduff called "Black Fokker Leader" Degalow comes over as a great chap & a gentleman.

  13. #13

  14. #14

  15. #15

    Default

    Very nice!!! They look great!!!

  16. #16

    Default

    Quote Originally Posted by Boney10 View Post
    Those are so good, how did you find assembly once you had put the lozenge decals on?
    I found it difficult to find the correct positions for the struts.
    You certainly don't look as though you had the same issue, cracking stuff Nigel
    I made faint "holes" in the fuselage sides where the struts are meant to go (just scratching the paint off in reality). I also (fortunately) built the first one which had small indentations in the wings where the interplanes go, & I could still feel them after the decals were on. But I realized that the other 2 Fokkers were not so clearly indicated, so i drilled tiny holes to help locate the holes through the decal, then dilled tiny holes through the decal for the struts to go. A tiny bit of extra effort but well worth it.

  17. #17

    Default

    Quote Originally Posted by gully_raker View Post
    Just supurb work Nigel. Wonderful detail on the pilots.
    Are you planning to do Carl Degalow's "Golden Stag"?
    I have his biography by Peter Killduff called "Black Fokker Leader" Degalow comes over as a great chap & a gentleman.
    I have read Killduff's book to, which was really the source that inspired me to have a go, despite the proof-reading errors in it. As for the next one(s), you will have to wait and see. I am hoping for completion some time in the next week or so!


  18. #18

    Default

    Very well done,I was wondering about the "kit" version.

  19. #19

    Default

    Lovely job!

    Be careful, these d.vii kits become addictive.

    Ian

  20. #20

    Default

    Quote Originally Posted by Womble View Post
    Lovely job!

    Be careful, these d.vii kits become addictive.

    Ian
    Too late to discover that I am afraid!

  21. #21

    Default

    Quote Originally Posted by Dark Horse View Post
    I made faint "holes" in the fuselage sides where the struts are meant to go (just scratching the paint off in reality). I also (fortunately) built the first one which had small indentations in the wings where the interplanes go, & I could still feel them after the decals were on. But I realized that the other 2 Fokkers were not so clearly indicated, so i drilled tiny holes to help locate the holes through the decal, then dilled tiny holes through the decal for the struts to go. A tiny bit of extra effort but well worth it.
    Yes exactly what I ended up doing, just the holes were not well defined after putting the decals on.
    Thanks for posting the answer

  22. #22

    Hunter's Avatar May you forever fly in blue skies
    Users Country Flag


    Name
    Terry
    Location
    Arizona
    Sorties Flown
    2,813
    Join Date
    Feb 2011

    Default

    Swell job, Nigel. They look fantastic.

  23. #23

    Default

    Quote Originally Posted by Boney10 View Post
    Yes exactly what I ended up doing, just the holes were not well defined after putting the decals on.
    Thanks for posting the answer
    After I made the original small holes in the wings a bit bigger with a very small drill, I then decalled the wings. The holes did "disappear" under the taut decals. I had another "undecalled" Fokker nearby and I used that so that I could approximately see where the holes should be in the decalled Fokker. I then went "hunting" with a pin & poked holes in the decal when I re-found the holes where the struts are to be positioned (I figure that this practice will hold good until I have no more spare Fokkers to compare the holes to - then I will be doing it all by feel).

  24. #24

    Hunter's Avatar May you forever fly in blue skies
    Users Country Flag


    Name
    Terry
    Location
    Arizona
    Sorties Flown
    2,813
    Join Date
    Feb 2011

    Default

    You've done yourself proud! Outstanding!

  25. #25

    Default

    Thanks for the positive support everybody - I am very new at 1/144 painting and modelling and I still have a lot to learn!


Tags for this Thread

Bookmarks

Posting Permissions

  • You may not post new threads
  • You may not post replies
  • You may not post attachments
  • You may not edit your posts
  •