
-
 Airbrush turntable (easy and at no cost at all)
Hi there,
I'm still learning how to use my airbrush (daunting task!) and up until now, when applying a base coat or painting details, I used a round cardboard piece to put the object on and turned it between two bursts of paint.
This was a less than perfect solution for my need to get the object in the right position.
So I searched at my FLKitS and FLGS and found "professional" airbrushing turntables from a variety of companies. But I loathe to pay up to €35 for an article that was used previously to put old style TV sets on! (I know, I'm cheap!)
I even looked at Ikea and found a "cheese plateau" for less than €5, but it seems too large and heavy for my needs.
I'm a modeller, I like to build stuff: let's find a solution at home!
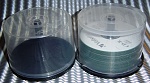
This is my solution: two old CD or DVD spindles, a piece of discarded foam core and a tube that previously contained some incense sticks (mango if you must know!).
Oh yes! And some "ceramic grease" that's lying around my workspace since aeons and of which I don't even know where it comes from or what it's used for initially...

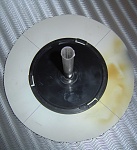
First, I have drawn two concentric circles on the foam core. The smaller being the same diameter as the spindle-base (just to know where it should be glued) and the second at the needed dimension for the turntable's... table.
Then I glued the spindle-base in place, taking care to get it as centred as possible, hence the first circle.
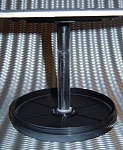
I then measured the total length of the two spindles' axles and cut the tube to the same length.
I glued the tube onto the axle of the main/top part.

Before I put the two spindles on top of each other, I lathered the bottom axle with the ceramic grease to ensure that the whole would turn smoothly.
Put it together and voilà a perfectly economical turntable!
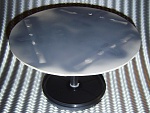
This is what it looks like after one use...
What I like about it:
- The price (of course)
- The ease to build it
- The relative sturdiness (don't put two lbs of white metal on it for too long)
- The fact that I can put my (left) hand under the turntable to turn it very easily
One thing I like a bit less: it's just a tad too high for my "airbrushing booth", so I'll need to make another one (as I only use acrylics, I don't need a 'proper' booth with ventilation and such, so this is easily fixed).
Hope you like it!

PS: the picture have been taken after first use, not during the actual building.
PPS: I just found a website explaining the same principle...  Is there nothing left to invent?
Last edited by petitbilbo; 05-20-2012 at 10:21.
Reason: "ceramic gease"
-
-
-

Very frugel and ingenius idea. Thanks for the tip.
-
In the words of an old beer commercial... "Brilliant!!!"
Tags for this Thread
 Posting Permissions
- You may not post new threads
- You may not post replies
- You may not post attachments
- You may not edit your posts
-
Forum Rules


 Reply With Quote


Bookmarks